19
(10) to scroll through the choices. Refer to Time Zone map in Appendix for more
information.
• Date - Enter the month, day and year of your observing session.
• Finally, you must enter the longitude and latitude of the location of your observing site.
Use the table in Appendix C to locate the closest longitude and latitude for your current
observing location and enter those numbers when asked in the hand control, pressing ENTER
after each entry. Remember to select "West" for longitudes in North America and "North" for
latitudes in the North Hemisphere. For international cities, the correct hemisphere is indicated
in the Appendix listings.
4. Select one of the four alignment methods as described below.
Auto Two-Star Align
Auto Two-Star Align allows the user to select two stars on which to align the telescope. To Auto Align your
telescope:
1. Select Auto Two-Star from the alignment choices given. Based on the date and time information
entered, the CGE will automatically select and display a bright star that is above the horizon.
• Press ENTER to select this star as your first alignment star.
• If for some reason the chosen star is not visible (perhaps behind a tree or building) press UNDO
to have the hand control automatically select the next brightest star.
• Or you can use the Up/Down keys to browse the entire Named Star list and select any one of
over two hundred alignment stars.
2. Once the telescope is finished slewing to your first
alignment star, the display will ask you to use the arrow
buttons to align the selected star with the cross hairs in the
center of the finderscope. When centered in the finder, press
ENTER.
3. The display will then instruct you to center the star in the
field of view of the eyepiece. When the star is centered,
press ALIGN to accept this star as your first alignment star.
4. After the first alignment star has been entered the CGE will
automatically select a second alignment star and have you
repeat this procedure for that star. When the telescope has
been aligned on both stars the display will read
Alignment Successful, and you are now ready to
find your first object.
For the best possible pointing accuracy, always center the alignment
stars using the up arrow button and the right arrow button.
Approaching the star from this direction when looking through the
eyepiece will eliminate much of the backlash between the gears and
assure the most accurate alignment possible.
Auto One-Star Align
Auto One-Star Alignment works much the same way as Auto Two-Star Align but uses only a single star in the
sky for alignment. This method of alignment is not as accurate as the two-star alignment and is recommended
only for telescopes that are permanently and accurately polar aligned.
O
bserving
Tip
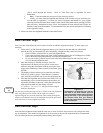
Figure 3-2
The Meridian is an imaginary line in the sk
y
that starts at the North celestial pole and
ends at the South celestial pole and passes
through the zenith. If you are facing South,
the meridian starts from your Southern
horizon and passes directly overhead to the
North celestial pole.


