


6
2. To turn on the Star Pointer, slide the On/Off switch to the 1 "On" position. To increase the brightness level of the
red dot, slide the switch to the 2 "On" position.
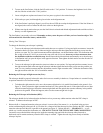
3. Locate a bright star or planet and center it in a low power eyepiece in the main telescope.
4. With both eyes open, look through the glass window at the alignment star.
5. If the Star Pointer is perfectly aligned, you will see the red LED dot overlap the alignment star. If the Star Pointer is
not aligned, take notice of where the red dot is relative to the bright star.
6. Without moving the main telescope, turn the Star Pointer's azimuth and altitude adjustment knobs until the red dot is
directly over the alignment star.
The Star Pointer is now ready to be used. Remember to always turn the power off after you have found an object. This
will extend the life of both the battery and the LED.
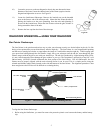
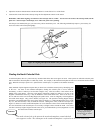
Moving Your Telescope:
To change the direction your telescope is pointing:
1. To move the telescope in declination (north/south) there are two options. For large and quick movements, loosen the
declination knob (see figures 8 & 9) when moving the telescope and then tighten the knob when you are near the
position you want. For very small movements and fine adjustments, use the declination cable. The declination cable
has a range of about 30° and if you come to the stop at the end of its travel, do not try to force movement when
the declination cable has reached the stop. Instead loosen the declination knob and manually move the telescope
in declination until you pass the object in the opposite direction. Then tighten the knob and reverse the direction of
the declination cable.
2. To move the telescope in right ascension (east/west) there are two options. For large and quick movements, loosen
the right ascension knob when moving the telescope and then tighten the knob when you are near the position you
want. For very small movements and fine adjustments, turn the right ascension cable. Unlike the declination cable,
the right ascension cable has 360˚ of continuous motion.
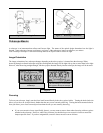
Balancing the Telescope in Right Ascension (R.A.):
The telescope should be properly balanced in order for it to move smoothly in both axes. Proper balance is essential if using
an optional motor drive for accurate tracking.
1. To balance the right ascension axis, move the counterweight shaft so it is parallel (horizontal) to the ground. (See
figure 2). Slowly release the right ascension knob and see if the optical tube moves. If the optical tube moves, then
slide the counterweight up or down the counterweight shaft until the optical tube remains stationary in the parallel
position to the ground. When this happens, make sure the counterweight lock is tight.
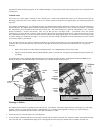
Balancing the Telescope in Declination (DEC):
The telescope should also be balanced on the declination axis to prevent any sudden motions when the DEC clamp is
released. To balance the telescope in DEC:
1. Release the R.A. clamp and rotate the telescope so that it is on one side of the mount (i.e., as described in the previous
section on balancing the telescope in R.A.).Lock the R.A. clamp to hold the telescope in place. Release the DEC clamp and
rotate the telescope until the tube is parallel to the ground (see figure 3). Release the tube — GRADUALLY — to see
which way it rotates around the declination axis. DO NOT LET GO OF THE TELESCOPE TUBE COMPLETELY!
Loosen the screws that hold the telescope tube inside the mounting rings and slide the telescope either forwards or
backwards until it remains stationary when the DEC clamp is released. Tighten the tube ring screws firmly to hold the
telescope in place.