


11
Using the Setting Circles
Setting Circles are dials (or gauges) for right ascension and declination that allow you to locate celestial objects easily
from their coordinates as listed in a star chart or atlas.
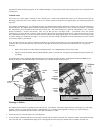
1. The declination setting circle (#16) is scaled in degrees and the right ascension setting circle is incremented in minutes.
The circles will get you close to your target but not directly on it. Also, the accuracy of your polar alignment will affect
how accurate your setting circles read.
2. The declination setting circle is factory set and should not need any adjustment if it reads accurately.
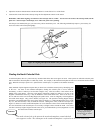
3. The right ascension setting circle (#14) must be aligned. Choose a bright and easy to find star in a star chart and note the
coordinates (right ascension and declination). Find the star in the Star Pointer and then in the telescope. Now, rotate the
right ascension circle to match the coordinates of the star with the indicator mark. If you polar aligned the telescope
accurately, the declination circle should be correctly set to the proper coordinates.
You may notice that there are two sets of numbers on the right ascension dial, one for the northern hemisphere
and one for the southern. Observers in the northern hemisphere should use the upper set of numbers while
southern observers should use the lower set of numbers. Remember in the northern hemisphere, the right
ascension should decrease as the telescope is moved towards the west.
4. The right ascension setting circle does not move as the telescope moves in right ascension and thus it must by aligned
each time you want to use it to find a new object. However, you do not need to use a bright star each time but you can
use the object you are currently observing.
5. Now, using a star chart or atlas you can find numerous objects. First move the telescope in declination to the correct
declination coordinate. Then move the telescope in right ascension until the indicator points to the correct coordinate.
6. After moving the telescope to the correct celestial coordinates, look through the lower power eyepiece to see if you have
located the object you wish to view. Center the object in eyepiece. If the object is not visible in the eyepiece, gradually
pan the telescope, using the right ascension and declination cables, until the object is visible. Always start by using your
lowest power eyepiece (20mm) then switching to higher power once you have found the desired object.
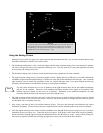
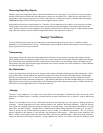
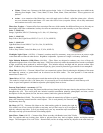
Figure 12
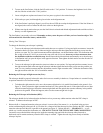
The two stars in the front of the bowl of the Big Dipper point to Polaris which is less
than one degree from the true (north) celestial pole. Cassiopeia, the “W” shaped
constellation, is on the opposite side of the pole from the Big Dipper. The North
Celestial Pole (N.C.P.) is marked by the “+” sign.
Note