


5
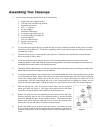
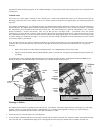
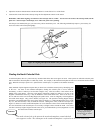
10) Loosen the set screw on the star diagonal so that it does not obstruct the inner
diameter of the barrel. Insert the chrome barrel of the 20mm eyepiece into the
diagonal and tighten the set screw. See Figure B
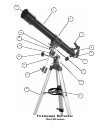
11) Locate the StarPointer finderscope. Remove the knurled nuts on the threaded
posts at the focuser end of the telescope tube. Mount the Star Pointer bracket by
placing the bracket over the posts protruding from the tube and tightening it
down with the knurled nuts. Orient the Star Pointer so that the glass window is
facing towards the front of the tube.
12) Remove the lens cap from the front of the telescope.
T
T
E
E
L
L
E
E
S
S
C
C
O
O
P
P
E
E
O
O
P
P
E
E
R
R
A
A
T
T
I
I
O
O
N
N
U
U
S
S
I
I
N
N
G
G
Y
Y
O
O
U
U
R
R
T
T
E
E
L
L
E
E
S
S
C
C
O
O
P
P
E
E
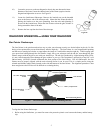
Star Pointer Finderscope
The Star Pointer is the quickest and easiest way to point your telescope exactly at a desired object in the sky. It's like
having a laser pointer that you can shine directly onto the night sky. The Star Pointer is a zero magnification pointing
tool that uses a coated glass window to superimpose the image of a small red dot onto the night sky. While keeping both
eyes open when looking through the Star Pointer, simply move your telescope until the red dot, seen through the Star
Pointer, merges with the object as seen with your unaided eye. The red dot is produced by a light-emitting diode (LED);
it is not a laser beam and will not damage the glass window or your eye. The star pointer is powered by a long life 3-volt
lithium battery (#CR2032) located underneath the front portion of the Star Pointer. Like all finderscopes, the Star
Pointer must be properly aligned with the main telescope before it can be used. This is a simple process using the
azimuth and altitude control knobs located on the side and bottom of the Star Pointer. The alignment procedure is best
done at night since the LED dot will be difficult to see during the day
.
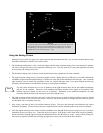
To align the Star Pointer finderscope:
1. Before using the StarPointer, you must first remove the protective plastic cover between the battery and the battery
clip.
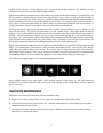
Glass Window
Battery Compartment
Dovetail Mounting Bracket
Altitude Adjustment
Knob
On / OFF / Brightness
Switch
Figure 1 – The StarPointer Finderscope with Mounting Bracket
Azimuth Adjustment Screw (Adjustment knob
located on opposite side)
Figure B