


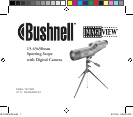


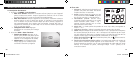


SPOTTING SCOPE INSTRUCTIONS
MOUNTING
Remove the spotting scope from the packaging. Attach the tripod with
the provided screw to the tripod mount hole located on the base of the
spotting scope. Spread the tripod legs and set on a solid surface.
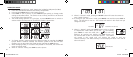
MAGNIFICATION
Note: Some specialized spotting scopes have a fixed magnification with
no zoom. For zoom magnification scopes, grasp and rotate magnification
ring to change power. The magnification ring is typically found near the
eyepiece. When rotating this ring, the image appears to zoom in and out.
It may be necessary to re-focus when the magnification is changed.
FOCUSING
Most focus rings are found in front of the eyepiece on the spotting scope
body. By turning this adjustment, the image will sharpen until in focus.
On some spotting scopes, the focus ring is on or near the eyepiece.
USING THE TRIPOD
(Included with most spotting scopes, except special use spotting scopes)
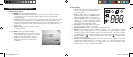
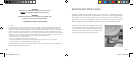
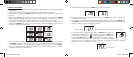
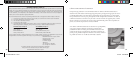
18. If the camera is connected to your PC via USB cable, the display will show
12 13
DOWNLOADING THE PICTURES TO YOUR COMPUTER:
The camera can be detached for more convenient downloading, just slide it out of the mounting
bracket. Windows 98 users
must install the driver (insert the CD, and click "Install Driver") prior
to connecting the camera , and following these instructions. Windows 2000, ME, and XP do not
require a driver. Once the camera is connected to your PC with the supplied USB cable, it will be
recognized as a "mass storage device". Open Windows Explorer or My Computer, the camera is
shown as a new "Removable Disk" icon. Open this "Disk", and locate your photos (.jpg files) inside
the folders. Click on an individual photo file, or use "Edit>Select All" if you want to download all
the photos. Then choose "Move to Folder..." in the Edit menu. You may choose an existing folder
(e.g. "My Pictures") or create a new folder located and named as you wish. Then click "OK" and
your photos will be transferred from the camera to that folder on your hard drive. The c
amera
may then be disconnected-you should first click the camera's icon in your system tray (move the
mouse cursor over icons in lower right corner of screen to find this) and follow the directions to
stop and remove the USB device.
To view and edit your photos, you may install PhotoSuite (click
"Install MGI PhotoSuite 5SE") from the included CD, or use any other photo editing software.
Select “File>Open” in the photo editor and navigate to the folder containing the transferred camera
files. Refer to the photo software’s instruction manual or Help menu for specific details on editing,
resaving and printing photos.
78-7348 6LIM.indd 12-13 8/17/04 3:39:35 PM