


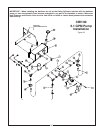

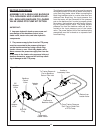

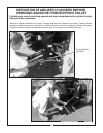


MECHANICAL THUMB INSTRUCTIONS - FIGURE 26
Thumb Operation
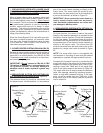
The Mechanical Thumb is used for picking up objects and securing them between the thumb and the bucket.
Large objects which can include rocks and logs when grasped, will increase momentum of backhoe as it is
swung side to side. Do not make sudden start and stops. Be careful lifting and moving long items such as tree
limbs, which will extend beyond the normal backhoe swing arc area.
Improper usage will damage backhoe and/or thumb.
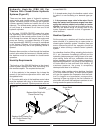
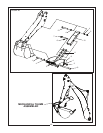
When thumb is not in use it should be placed in the “storage” position. Remove Hitch Pin and slide column
assembly to its “shortest” position. Secure using Hitch Pin and Hair Pin Clip. The two remaining holes in the
column assembly can be selected when using the thumb assembly.
Do not use Mechanical Thumb:
• As a pry bar to loosen objects.
• To push or pull material or objects.
• To move objects from side to side.
• As an area to wrap a chain or rope for lifting purposes.
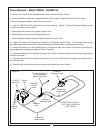
Installing Thumb to Backhoe
IMPORTANT – Improper hook-up can cause serious damage to backhoe components.
1. Park tractor with loader and backhoe on a level surface.
2. Set Parking Brake. Exit tractor.
3. Remove Boom Lock Pin from backhoe and place in storage location. Enter backhoe.
4. Lower Boom to place backhoe bucket on the ground. Rotate bucket such that the bucket side cutting edges
are parallel to the ground.
5. Exit backhoe and turn off the tractor ignition.
6. Remove hardware and pivot pin which secures Bucket to Dipperstick. Discard pivot pin and retain hardware
for use in a later step.
7. Assemble Mechanical Thumb (8) over Bucket and secure to backhoe using Pivot Pin (9), Shims (5) as
required, and hardware removed earlier.
8. Attach Upper Column Weldment (10) to underside of Dipperstick Weldment using Bolt (2), Flat Washers (4),
and Nut (3). Do not over tighten hardware. Upper Column must pivot freely under Dipperstick.
9. Install Lower Column Weldment (11) into Upper Column Weldment (10). Secure Upper Column into lowest
of the three holes of the Lower Column using Hitch Pin (7) and Hair Pin Clip (6).
10. Connect Column assembly to Mechanical Thumb (8) using Bolt (1), Flat Washers (4), and Lock Nut (3). Do
not over tighten hardware. Column assembly must pivot freely in Mechanical Thumb
47