


CALL TOLL-FREE 1-800-DR-OWNER 31
Removing and Replacing the Swinging Blades
WHEN PERFORMING ANY ADJUSTMENT OR MAINTENANCE, YOU MUST FIRST SHUT OFF THE ENGINE,
WAIT FIVE (5) MINUTES TO ALLOW PARTS TO COOL AND DISCONNECT THE SPARK PLUG WIRE(S),
KEEPING IT AWAY FROM THE SPARK PLUG(S).
Tools and Supplies Needed:
• (2) 15/16" Wrench
• Gloves
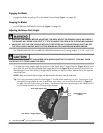
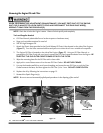
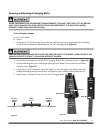
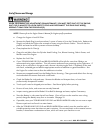
1. Using two (2) 15/16" Wrenches, remove the Top Lock Nut (right-hand, regular thread), the Backing
Nut, and then the Blade Bolt followed by the Pro-Tek™ Swinging Blade (Figure 23).
USE CAUTION WHEN PUSHING OR PULLING THE WRENCH NEXT TO THE BLADE. WEAR GLOVES; IF THE
WRENCH SLIPS OFF THE BOLT, YOU MAY BE SERIOUSLY INJURED.
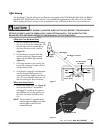
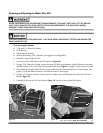
2. Reinstall the sharpened or a new Pro-Tek™ Swinging Blade in the orientation shown in (Figure 24).
3. Install the Backing Nut until it seats finger tight against the Blade Carrier to allow for the Blade
Swinging action (Figure 23).
4. Using two (2) 15/16" Wrenches, install and tighten the Lock Nut against the Backing Nut while
holding the Backing Nut with one Wrench and tightening the Lock Nut with the other Wrench.
5. Repeat steps 1 through 3 for the other Pro-Tek™ Swinging Blade.
Figure 23
Bottom
View
Top View
Lock Nut
Blade
Carrier
Backing Nut
Pro-Tek™
Swinging
Blade
Figure 24
Blade Bolt
Blade
Carrier
Pro-Tek™
Swinging
Blade
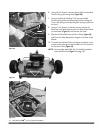
Pro-Tek™
Swinging
Blade