


CALL TOLL-FREE 1-800-DR-OWNER 29
Removing and Replacing the Blades’ Drive Belt
WHEN PERFORMING ANY ADJUSTMENT OR MAINTENANCE, YOU MUST FIRST SHUT OFF THE ENGINE,
WAIT FIVE (5) MINUTES TO ALLOW PARTS TO COOL AND DISCONNECT THE SPARK PLUG WIRE(S),
KEEPING IT AWAY FROM THE SPARK PLUG(S).
USE ONLY DR BELTS ON YOUR MACHINE. THEY HAVE BEEN THOROUGHLY TESTED AND PROVEN FOR
MANY HOURS OF USE.
Tools and Supplies Needed:
• 7/16" and 1/2" Wrench or Socket
• 9/16" Wrench
• Side Cutters or Scissors
• Hooked End Pulling Tool - Optional (we suggest a Tent Peg Puller)
• New Belt – Part Number 221331
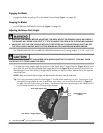
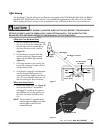
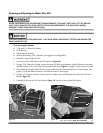
1. Turn the Fuel Shut-Off Valve to the OFF position (Figure 18).
2. Using a 7/16" Wrench or Socket, remove the three (3) Bolts, Lock Washers, and Flat Washers that retain
the Black Pulley Cover; cut the Zip-Tie around the Wire Cord (Figure 5 on page 17) and remove the Cover.
3. Disconnect the Throttle Cable from the Engine and then slide it from behind the Fuel Tank Straps. See
pages 17 & 18 and follow the steps in the reverse order for your Engine.
4. Using a 1/2" Wrench or Socket, remove the four (4) Bolts and Lock Washers that retain the Fuel Tank
Mount (Figure 18).
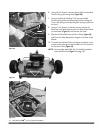
5. Carefully lift and set the Fuel Tank Mount (Figure 19) to the Fuel Line side of the Engine.
Figure 18 Figure 19
Fuel Tank Mount
Bolts
&
Washers
(2 per side)
Fuel Shut-Off
Valve to OFF
To this side for Kawasaki
To this side for B
&
S