


5
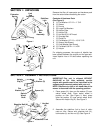
Figure 5
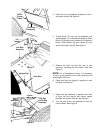
Figure 6
Figure 7
Figure 8
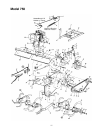
3. Place the link rod assembly through the slot in
the tractor fender. See Figure 5.
4. Thread ferrule (C) onto link rod assembly until
approximately 1/4” of threads are showing. Place
ferrule (C) through hole in bottom of lift handle on
tractor. Slide washer (M) onto ferrule (C) and
secure with hairpin clip (N). See Figure 6.
5. Remove the hitch rod from the rear of your
tractor by removing the two hairpin clips. See
Figure 7.
NOTE:
On 16 horsepower tractors, it is necessary
to hold up the gasoline tank when removing and
replacing the hitch rod.
6. Place new hitch rod (longer) in position on rear
of tractor. See Figure 7.
7. Place hitch bar assembly in position over ends
of hitch rod and secure with hairpin cotters
provided with tractor hitch bar. See Figure 8.
8. Turn flat end of link rod assembly so that the
notch is down. See Figure 8.
Slot In
Tractor
Frame
Link Rod
Assembly
Lift
Handle
Ferrule
Link Rod
Assembly
Hitch Rod
Rear of Tractor
Notch
Flat End
of Link Rod
Assembly
Hitch
Bar
Assembly
Hairpin Clip