


Contact 1-800-762-1142 for assistance.
Do not return to place of purchase.
®
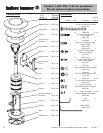
Owner’s manual: model 235000 outdoor patio heater 6/11/04
9
Contact 1-800-762-1142 for assistance.
Do not return to place of purchase.
®
Owner’s manual: model 235000 outdoor patio heater 6/11/04
10
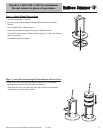
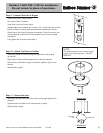
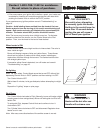
Step 6 – Attach Small & Medium Dome to Engine
Set Engine Assembly on its top as shown at left.
Carefully slide Medium sized Dome over Engine Assembly, and line up
slots in Dome with fins on Dome Brackets.
Line up holes in Dome with threaded holes in Bracket and insert Short
Bolt into each hole, finger tightening at first.
After three bolts are in place, tighten with 7/16” wrench.
Repeat process for Small Dome.
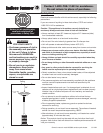
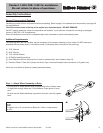
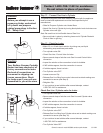
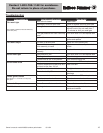
Step 8 – Attach Engine/Post to Platform
Insert Platform Cover over Gas Line and set on top of Shroud Cover.
Insert end of Post without holes over Gas Line, being careful not to bend
Gas Line.
Slide Post through Cover and into collar of Platform so Post rests
completely on Platform.
Align the Control Panel with either the right or left leg attached to base.
Slide Platform Cover up to expose setscrews in Platform and tighten
bottom three setscrews with hex (Allen) wrench supplied.
Make sure Post is perpendicular to Base.
Use top three setscrews to adjust Post’s angle as necessary.
Tighten all six setscrews and slide Cover back down.
Note: Post must be perpendicular to Base. Failure to do so will adversely
affect burner performance.
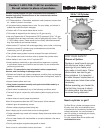
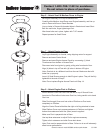
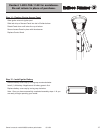
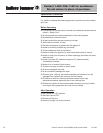
Step 7 – Attach Engine to Post
Lay Engine Assembly on its side, using shipping carton for support.
Remove and save Control Knob.
Remove and save Engine Access Panel by unscrewing (1) black
Thumbscrew from bottom of Access Door.
Disconnect wire from Igniter by gently pulling wire from back of box.
Align (4) holes in top of Post with (4) holes in bottom of Engine.
Note: One hole is at a different level than the rest. Make sure that all 4
holes line up properly.
Insert (4) Small Screws enough to hold Engine in place. They will be fully
tightened at the end of Step 9.
Note: Do not replace Engine Access Panel until Step 14.