


11
WARNING:
WARNING:
Always wear protective
gloves when installing or
removing the saw chain. The saw
chain is sharp and can cut you
when it is not running.
WARNING:
The chain guide bar and chain
may become hot during use.
Allow to cool before adjustment or
removal.
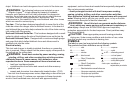
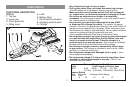
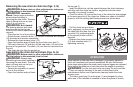
- Place the tool on a firm surface.
- Rotate the two retention bolts (11) counter clockwise with wrench
(12) provided and remove completely.
- Remove the chain access cover (13).
- Open the handles and pull back the top chain cover jaw (1).
- Pull back chain bar (3) and then lift the saw chain (14) out of the
groove in the guide bar. The chain (14) can then be removed from
the unit.
- The chain bar can then be angled up.
WARNING:
WARNING: Always wear
protective gloves when installing or
removing the saw chain. The saw
chain is sharp and can cut you
when it is not running.
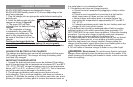
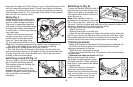
- Ensure the operation is carried
out on a firm surface.
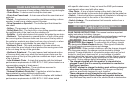
- Open the handles and pull back
the top jaw (1).
- Insert the chain bar into the space between the chain tensioner
and align with the chain bar locator, angle the chain bar down
ensuring it is correctly located.
- Place the chain (14) around the front of the chain bar and engage
in the nose sprocket of the chain bar. Make sure chain is installed
properly, with the cutting teeth facing forward as shown here.
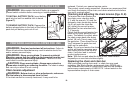
- Pull the chain bar and chain
back, engaging it in the groove in
the chain bar and then over the
sprocket (15) positioning teeth
in the correct position on the
sprocket.
- Replace the chain access cover
(13) and retention bolts (11)
tightening securely.
Never operate a chain saw that is damaged or improperly adjusted or
that is not completely and securely assembled. Be sure that the saw
chain stops moving when the power control system triggers are released.
Never adjust the guide bar or saw chain when the engine is operating.
WARNING: Let the tool work at its own pace. Do not overload.
- Carry out regular cleaning of the unit as described in the
maintenance section and in particular cleaning inside the chain
access cover.
- The lower guard jaw (2) and top jaw (1) are designed to close
when one of the handles is released or when the piece of branch
F
14
3
1
G
1
3
H
14
14
15
15