


6
• Place the bulk of the extension cable
on the lawn close to the starting point
(Fig. Ja position 1).
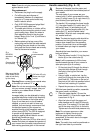
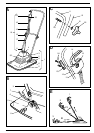
Your switch box incorporates a cable
restraint. To fix the cable to the restraint,
proceed as follows:
• Bring the socket end of the extension
cable from behind and connect it to your
mower plug.
H
• Form a loop on your extension cable
close to the switchbox.
• Push the loop through the slot from
the opposite side of the restraint hook,
position the loop over the hook and
pull the cable back through the slot.
Your cable will now be restrained.
• The extension cable should now fall
away from your mower and behind the
operator, ready for use.
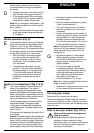
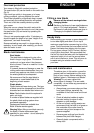
!
Warning! Do not attempt to operate your
mower with one hand - you must guide it
with both hands.
• Lift the handle up to release it from the
park position.
• Tilt the unit slightly on its side to reduce
the risk of lawn damage whilst starting,
depress the safety lock-off button (15)
on the switchbox (13) (Fig. D), and whilst
still depressed pull the switch lever (14)
towards you. Your mower will start, and
you can now allow it to return to its
proper cutting position, and commence
cutting.
J
• Proceed down the cutting area as
shown in Fig. Ja, working from position
1 towards position 2 and, on reaching
position 2, turn to the right and proceed
towards position 3. Continue to the end
of the cutting area, turn to the left, and
proceed towards position 4. Continue in
the same manner as shown in Fig. Ja,
always working away from the cable.
Do not adopt the method shown in
Fig. Jb, working towards the cable,
as this can be dangerous.
Your mower will continue to operate whilst
you are pressing the switch lever. If you
release it for any reason you will not be able
to press it again until you have pressed the
safety lock-off switch on the switch box.
This feature prevents accidental restart.
When you have finished using your mower
we recommend that you clean all debris
from it before putting it away. Refer to the
“Care and maintenance” section.
Note: To obtain the best results cut your
lawn or grassed area regularly and do not
cut when the grass is wet.
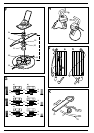
Changing to the plastic blade system
(Fig. K)
A plastic cutter blade system can be
purchased as an accessory for your mower.
This system comprises a blade carrier and a
number of blades.
The steel blade is designed to give a fine
finish in long or tough grass.
The plastic blade system can be used for
safer cutting in normal conditions. It should
not be used to cut tough or long grass as
the plastic blades are not designed for
this purpose.
To remove the steel blade and to fit the
plastic blade system, proceed as follows:
!
Warning! Disconnect your mower from the
electrical supply before fitting the plastic
blade system.
• Remove the steel blade as described in
“Height of cut adjustment” but retain the
two thicker spacers and the nut.
• If you wish to alter the height of cut
whilst fitting the plastic blade system
then follow the instructions given in
“Height of cut adjustment”.
• Using a damp cloth, clean the contact
faces of the spacer rings, removing any
grass or debris.
• Fit any spacers necessary to give the
correct height adjustment, fit the blade
carrier (25) on to the motor spindle with
the ribbed face towards the impeller,
fit any remaining spacers and fit the nut.
Use a cloth or wear a heavy duty glove
to prevent the blade carrier from turning
and tighten the nut with the spanner
provided.
Note: Instructions on how to fit the blade
carrier to your mower are also given on a
label on the blade carrier.
K
• Attach two plastic blades (30) to the
blade carrier (25), by placing one blade
on each blade pivot (31) and pull the
blades outwards so that they are locked
into position.
• Your mower is now ready for use.