


5
OPERATION
PLEASE REFER TO DIAGRAMS (A, B, C...) AND ITEM NUMBERS
(1, 2, 3...) AS NOTED THROUGHOUT MANUAL. FOR EXAMPLE,
A-1 REFERS TO ITEM 1 IN FIGURE A.
KNOW YOUR MOWER
READ THIS INSTRUCTION MANUAL AND SAFETY RULES
BEFORE OPERATING YOUR MOWER. See diagram G to familiarize
yourself with the location of various controls and adjustments
referenced below. Save this manual for future reference.
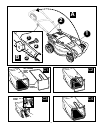
G-1: Safety key
G-2: Switch lever
G-3: Handle adjustment knobs
G-4: Handle storage knobs
G-5: Grass bag
G-6: Cut height adjustment release
G-7: Cut height indicator
SAFETY KEY
DANGER : SHARP MOVING BLADE.
In order to prevent accidental start-up or unauthorized use of your
Cordless Mower, a removable Safety Key D-6 has been incorporated
into the design of your mower. The mower will be completely disabled
when the Safety Key has been removed from the mower. With the
Safety Key removed, you will have access to the charger receptacle D-8.
AFTER REMOVING THE SAFETY KEY, ONLY GRASPTHE
PLASTIC HANDLE OF THE KEY, AS THE METAL MAY BECOME
WARM AFTER THE MOWER HAS BEEN OPERATING.
NOTE: THE SAFETY KEY HAS A STRAP ATTACHED IN THE
CENTER TO ALLOW FOR STORAGE ON A NAIL, OUT OF THE
REACH OF CHILDREN. DO NOT TETHER SAFETY KEY TO MOWER.
DANGER: ROTATING BLADES CAN CAUSE SERIOUS
INJURY. TO PREVENT SERIOUS INJURY, REMOVE SAFETY KEY
WHEN UNATTENDED, OR WHEN CHARGING, CLEANING,
SERVICING, TRANSPORTING, LIFTING, OR STORING MOWER.
TO TURN MOWER ON
Insert Safety Key D-6 into the switch housing, push in and rotate 1/4
turn clockwise until safety key is fully seated inside housing.
The mower is now operational and can be started by activating the
switch lever.
DANGER: SHARP MOVING BLADE. NEVER ATTEMPT TO
OVERRIDE THE OPERATION OF THIS SWITCH AND SAFETY KEY
SYSTEM AS SERIOUS INJURY COULD RESULT.
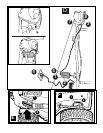
ON-OFF SWITCH LEVER - FIGURE H
Your mower is equipped with a special on-off switch system. To
operate the system, first push switch lever out (H-1), then pull it to the
handlebar (H-2).To turn the mower off, just release the switch lever.
Once the switch lever has returned to the original position it will
activate the “Automatic Braking Mechanism”. The motor is electrically
braked and the mower blade will stop rotating in 3 seconds or less.
MEETS CPSC SAFETY REQUIREMENTS
Black and Decker Mowers conform to the safety standards of the
American National Standards Institute, and the U.S. Consumer Product
Safety Commission. The Blade turns when the motor is running.
SAFETY
SHIELD
AND REAR DOOR
This safety shield I-1 is designed to minimize the throwing of stones or
other objects by the mower blade backward from under the mower
deck. The shield, along with the rear door I-2, minimizes the possibility
of accidental foot contact with the blade. DO NOT operate mower
without the safety shield and rear door in place.
DANGER: Sharp moving blade. For your own safety DO NOT
use this mower without either the grass catcher or mulch insert in
operating position as serious injury could result.
DANGER: Sharp moving blade. Do not operate the mower if the
rear door is not closed under spring tension as serious injury could
result. Take your mower to the nearest service center for repair.
REMOVING MULCH INSERT
To remove the mulch insert I-3 so that you can bag the grass or
discharge with the optional discharge chute, follow the steps listed
below:
1. Release switch lever to turn mower off, wait until the blade stops
and remove safety key D-6.
2. Raise the rear discharge door I-2 and hold it up.
3. Locate your hand in the handle pocket I-4 as shown, and lift and
pull out the mulch insert I-3 completely.
4. The rear discharge door is spring loaded. When you release it the
door will return to the closed position.
INSTALLING MULCH INSERT
1. Repeat steps 1 and 2 for removing mulch insert.
2. Slide the mulch insert I-3 into the discharge opening until it is firmly
in contact with the deck.
3. Release rear door and ensure it is properly closed.
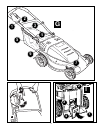
INSTALLING GRASS CATCHER
1. Release switch lever to turn mower off, wait until the blade stops
and remove safety key D-6.
2. Reaching down between the mower handles, raise the rear
discharge door J-1 to a vertical position and hold the door up.
Ensure that the mulch insert I-3 has been removed.
3. Pick up the grass catcher J-2 by the handle J-3 and place the
grass catcher between the mower handles as shown.
4. Position the grass catcher hanger hooks J-4 on the mower as
shown in Figure K. Release the rear discharge door.
DANGER: Sharp moving blade. Never operate the mower
unless the hanger hooks on the grass catcher are seated properly on
the mower and the rear discharge door rests firmly against the top of
the grass catcher as serious injury could result.
MOWING TIPS
NOTE: ALWAYS INSPECT AREA WHERE MOWER IS TO BE USED
AND REMOVE ALL STONES, STICKS, WIRE, BONES AND OTHER
DEBRIS WHICH MIGHT BE THROWN BY THE ROTATING BLADE.
1. Mow across the face of slopes, never up-and-down. Exercise
extreme caution when changing direction on slopes. Do not mow
excessively steep slopes. Always maintain good footing.
2. Release switch lever to turn mower “OFF” when crossing any
gravel area (stones can be thrown by the blade).
3. Set mower at highest cutting height when mowing in rough ground
or in tall weeds. Removing too much grass at one time can cause
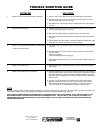
circuit breaker to trip, which stops mower. Refer to troubleshooting
guide.
4. If a grass catcher is used during the fast growing season, the grass
may tend to clog up at the discharge opening. Release switch lever
to turn mower off and remove the safety key. Remove the catcher
and shake the grass down to the back end of the bag. Also clean
out any grass or debris which may be packed around the discharge
opening. Replace the grass catcher.
5. If mower should start to vibrate abnormally, release switch lever to
turn mower off and remove safety key. Check immediately for
cause. Vibration is a warning of trouble. Do not operate mower until
a service check has been made. Refer to troubleshooting guide in
manual.
6. ALWAYS RELEASE SWITCH LEVER TO TURN MOWER OFF
AND REMOVE SAFETY KEY WHEN LEAVING IT UNATTENDED
EVEN FOR A SHORT PERIOD OF TIME.
THE FOLLOWING SUGGESTIONS WILL HELP YOU TO OBTAIN
OPTIMUM RUN TIME FROM YOUR CORDLESS MOWER: