


Part No 440271 Form No F070809A
13
FORCE BLOWER Self-propelled Owner’s Manual
DRIVE CHAIN REPLACEM
ENT
1. Wait for engine to cool and disconnect spark plug.
2. Place a block of wood, or another object that will support and
steady the unit under the axle on the side of the machine you will
be working on.
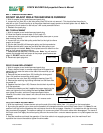
3. Remove the two screws (item 103) holding the chain guard
(item 104) and then remove the chain guard.
4. Loosen the two nuts (item 98) holding the bearing (item 97).
5. Remove the retaining ring holding the wheel on and then slide
the wheel off.
6. Replace the chain (item 105). Remove the old chain by walking
it off the sprockets.
7. Position the bearing so that it applies the proper tension to the
chain and tighten the nuts holding the bearing Note: DO NOT
over tighten the chain, as this will cause premature failure.
Likewise if the chain is too loose it will come off when the drive is
engaged.
8. Reassemble the machine using steps 1-4 in reverse order.
BELT TENSION ADJUSTM
ENT
DO NOT ADJUST WHILE THE MACHINE IS RUNNING!
1. Wait for engine to cool and disconnect spark plug.
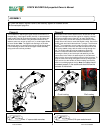
2. Loosen the nut (item 92) on the Idler pulley (item 93) but do not remove it. This should allow the pulley to
slide left or right. Once the pulley is at the proper distance to apply tension to the belt tighten the nut. Note: Do
not place too much tension on the belt, as it will cause premature failure.
3. Reattach the spark plug.
BELT REPLA
CEMENT
1. Wait for engine to cool and disconnect spark plug.
2.Follow the Impeller removal steps (2-5 on page 12).
3. Remove the four bolts (item 8) holding the back plate (item 4) to the
back housing (item 6).
4. Loosen the nut on the idler pulley and slide it to the right to relieve
tension on the belt.
5. Slip the belt (item 86) off the engine pulley and the transmission.
6 Replace the belt with a new one and slide the Idler pulley to put
proper tension on the belt. Note: Do not place too much tension
on the
belt, as it will cause premature failure.
7. Reassemble the machine in reverse order. Note: You will need to
replace the Impeller bolt and torque to the proper specifications see
page 16, DO NOT use the old one.
8. Reconnect spark plug wire.
CLUTCH CABLE ADJUSTM
ENT
1. With the machine off, loosen the two nuts on the end of the clutch cable (item 111) going in to the transmission.
2. By moving the position up or down on the threads it will change the tension on the clutch lever (item 113). Note: Do not
position it too high on the threads as this could cause the drive not to engage. Likewise, if it is placed too low the drive may
stay permanently engaged. The optimum setting is to remove any slack in the clutch cable when disengaged. The travel of
the clutch control will apply the correct spring force on the cone clutc
h. Once the desired position is in place tighten the nuts
securely.
3. Start the machine and check the operation. If the drive cable is not engaging properly, shut the machine off and
reposition the nuts on the cable to tighten the drive cable.
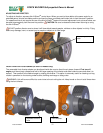
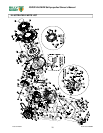
Idler Pulley
Loosen these
nuts