


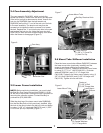
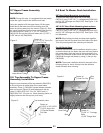
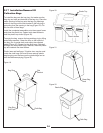

2-6 Mount Tube Stiffener Installation
Place the lower mount tube stiffener P#(B0247) between
the lower mount tube (previously installed) and the
mower’s rear frame positioning the bend flaps
downwards (Figure 8). Fasten to the mower’s rear frame
by using (2) ½”-13 x 1” HHCS P#(K1231), (2) fender
washers P#(K0041) and (2) ½”-13 flange nuts
P#(K1246). Fasten to the lower mount tube by using (1)
3/8”-16 U-bolt P#(K1432) and (2) 3/8”-16 flange nuts
P#(K1215). Tighten all nuts and bolts.
7
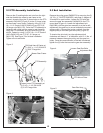
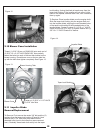
2-4 Cam Assembly Adjustment
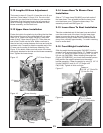
2-5 Lower Frame Installation
The cam assembly P#(A0422), which controls the
blower belt tension, comes from the factory pre-adjusted.
If the belt is too tight or becomes too loose, remove the
hair pin clip P#(K0099) from the belt tension rod
P#(K0326) and pull the “L” end of the rod out of its hole
in the cam assembly. The tension rod may then be
screwed out to tighten the belt or screwed in to loosen
the belt. Replace the “L” end into the top hole in the cam
and replace the hair pin clip. Adjust the cam stop bolt
P#(K1159) to allow the cam to rotate slightly over center
when the blower is disengaged (Figure 6).
Before continuing installation, you must install
the Bad Boy Pup Series bolt-on hitch P#(093-1112-00)
for the rear of the mower. Adding this hitch is required for
mounting the collection system. Contact Bad Boy to
purchase at (870) 698-0090.
Slide the short leg of the lower mount tube P#(B0246)
into the Bad Boy bolt-on hitch previously installed. Align
the hole in the mount tube to the bolt-on hitch and fasten
by using (1) 5/8” x 3” clevis pin P#(K0172) and (1) 5/32”
x 2-5/8” hair pin clip P#(K0088) (Figure 7).
NOTE:
Cam Assy.
Tension Rod
Figure 6.
Cam Stop
Bolt
Figure 7.
Lower Mount Tube
Bad Boy Receiver Hitch
Fasten Here w/
(1) 5/8” x 3” Clevis Pin
(1) Hair Pin Clip
Figure 8.
Lower Mount
Tube Stiffener
Fasten w/
(1) 3/8” U-Bolt
(2) 3/8” Flange Nuts
Lower Mount Tube
Fasten w/ (2) ½” x1” HHCS
(2) Fender Washers
(2) ½” Flange Nuts