


GB - 20
4. Remove belt finger by removing cap screw
mounting belt finger to engine (Figure 22 or
Figure 23).
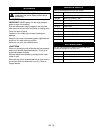
5. Remove attachment drive belt from engine
sheave (it may be necessary to turn engine
sheave using recoil starter handle).
IMPORTANT: To avoid bending bottom cover, when
tipping unit apart, support handlebars firmly or tip unit
up on housing and remove bottom cover by removing
four cap screws before separating unit.
6. Support Sno-Thro frame and housing.
7. Remove top two cap screws and loosen lower
two cap screws holding blower housing to frame
(one on each side).
8. Separate housing from unit. Lower handlebar on
floor.
9. Remove attachment drive belt from lower pulley
(hold brake away from belt).
Replace Attachment Drive Belt
1. Place new belt onto lower pulley and while
holding brake out of way, tip unit together.
2. Secure blower housing to frame with cap screws.
3. Place belt onto engine sheave.
4. Replace belt finger.
IMPORTANT: BELT FINGER MUST BE between 1/16
to 1/8 in. (1.6–3 mm) from belt with attachment clutch
engaged or belt grabbing may occur causing impeller
to rotate while attachment clutch is disengaged
(Figure 24).
5. Adjust clutch per Attachment Clutch/Impeller
Brake Adjustment below.
6. Replace chute crank and secure with spring pin
(932045, 046, 047).
7. Replace belt cover and secure with cap screws.
CAUTION: Always support Sno-Thro frame
and housing when loosening the cap screws
holding them together. Never loosen cap
screws while unit is in service position.
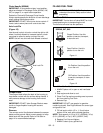
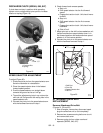
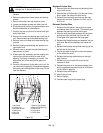
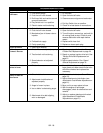
Figure 21
1.Pinion and Gear
2. Belt Cover
3.Spring Pin
4.Chute Crank
5.Bottom Cover
6.Belt Cover Screw
7.Housing Bolt Holes
OS7240
1
2
3
4
5
6
7
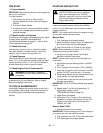
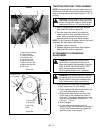
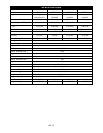
Figure 22
1.Attachment Drive Belt
2.Engine Sheave
3.Traction Drive Belt
4.Camshaft Pulley
5.Traction Belt Idler
6.Attachment Pulley
7.Attachment Idler Nut
8.Attachment Belt Idler
9. Belt Finger
OS7245
1
2
3
4
5
6
78
9
932046, 047, 048