


4-2 Measuring Procedure
The H300default unit of measure is °C. To switch to °F see section 5-1.The sampling time
default for data logging is set at 2 seconds.To change this sampling time see section 4-7.
4-3 Humidity & Temperature Measurement
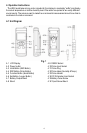
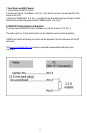
1. Plug the “Probe Plug” (4-11, Fig. 1) into the “Probe Input Socket” (4-10, Fig.1).
2. Power on the meter by pressing the “Power Button” (4-2,Fig.1) for 2 seconds. The LCD will
show the units of measure on the displayafter a quick self test.It will display the %RH in the
main display and temperature in the bottomsection of the LCD.
3. The meter displays temperature in °C by default,t o switch to °F see section 5-1.
4-4 DEW Point Measurement
To measure DEW Point follow the instructions shown in section 4-3 and thenpress the
“Function Button” (4-5,Fig. 1) momentarily once. The LCD will show the word DEW in the main
display and temperature below.
4-5 Data Hold
While taking measurements you can freeze thedisplayed value by pressing the“Hold Button”
(4-3,Fig. 1) once. The HOLD symbol will bedisplayed along with the held measured value on
the LCD. By pressing the“Hold Button” (4-3,Fig. 1) a second time will release the displayed
valueand turn off the data hold function.
4-6 Data Record (MAX/MIN)
1. To record the maximumand minimumreadings, press the“REC Button” (4-4,Fig. 1). The
REC symbol will be displayedon theLCD. By pressing the“REC Button” (4-4, Fig. 1) you can
toggle through the Max and Min values.
2. To delete the recorded valuespress and hold the “Hold Button” (4-3,Fig. 1) for about3
seconds.
3. To stop using the REC function,press and hold the“REC Button” (4-4, Fig. 1) for at least 3
seconds.
4-7 Auto Data Logger
Setup process will be described first because the Auto DataLogger function will not work if the
sampling seconds is set to 0. If you do not need to setup your meter, skip to step 7.
1. Press and hold the“SET Button” (4-6, Fig.1) for about3 seconds to enter the settings menu
(you will see the word code on the bottomof the LCD).
2. Pressing the “Enter Button” (4-4, Fig. 1) will bring you to the unit of measure for temperature
(see section 5-1 if you wish to change the unit of measure).
3. Press the “Logger Button” (4-6, Fig.1) and SEC will be displayed on thebottomof the LCD.
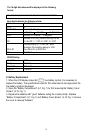
4. To cycle through the numberof seconds you would like meter to wait between loggings,
press the“Function Button” (4-5, Fig. 1). By pressing the “Function Button” (4-5,Fig.1) the
following number of seconds willbe displayed on the top of the LCD: 1, 2, 10, 30, 60,600,
1800 or 3600.
5. Once the number seconds you require is displayed on the LCD, press the“Logger Button”
(4-6,Fig.1).
6. Press the “Enter Button” (4-4, Fig. 1) to exit the settings menu,then press the“ESC Button”
(4-3,Fig. 1).
7