4 Pelco Manual C350M-H (10/99)
MOUNTING
Make sure the mounting surface can support four times the combined weight of the scanner
and the camera and lens or enclosure, camera, and lens. Refer to the manuals for your en-
closure, camera, and lens for the weights of those units. The weight of the camera and lens
or enclosure, camera and lens must not exceed 15 pounds (7 kg).
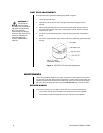
To mount the scanner directly to a solid surface, attach the adapter plate to the scanner
with the three 10-32 mounting screws provided. Fasten the adapter plate to the solid sur-
face using four number 10 screws or other suitable fasteners.
If you use a wall, or ceiling/pedestal mount, follow the instructions that are provided with the
mount and then attach the scanner to the mount with the three 10-32 mounting screws sup-
plied.
CAMERA/ENCLOSURE MOUNTING
To mount a camera or enclosure, lift the tilt table. Center (balance) the camera and lens or
enclosure, camera and lens load on the tilt table. Adjust the position as needed to align the
mounting holes. A 1/4-20 hex head bolt (not supplied) is required to mount the camera to
the tilt table. Secure the load to the tilt table. Manually adjust tilt table to desired angle and
tighten. Make all necessary electrical connections. To wire the camera and lens or camera
enclosure, refer to the manuals for that equipment.
ELECTRICAL INSTALLATION
This section provides instructions for wiring the scanner only.
PS7
The PS7 is supplied with a six-foot line cord. Plug the line cord directly into a standard
120 VAC outlet.
PS7-24
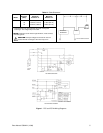
Remote Control - Connect the eight-foot cable to a terminal strip. Run a matching
cable from the terminal strip to the scanner control. Refer to the wiring diagram in Figure 1.
For inverted operation, reverse the left and right wires.
Refer to Table A for cable distances. The maximum distance is B. If you are using a relay
box, the maximum distance is A plus B.
Continuous-Duty Operation - Connect the COMMON and AUTO wires to a 24 VAC
power supply. Ground the green wire to the closest available ground. Refer to the wiring dia-
gram in Figure 1. Refer to distance B in Table A for cable distances.
CAUTION:
The
PS7 Series Scanner
is designed to
operate upright or inverted.
Do not mount horizontally.