EspañolEnglish
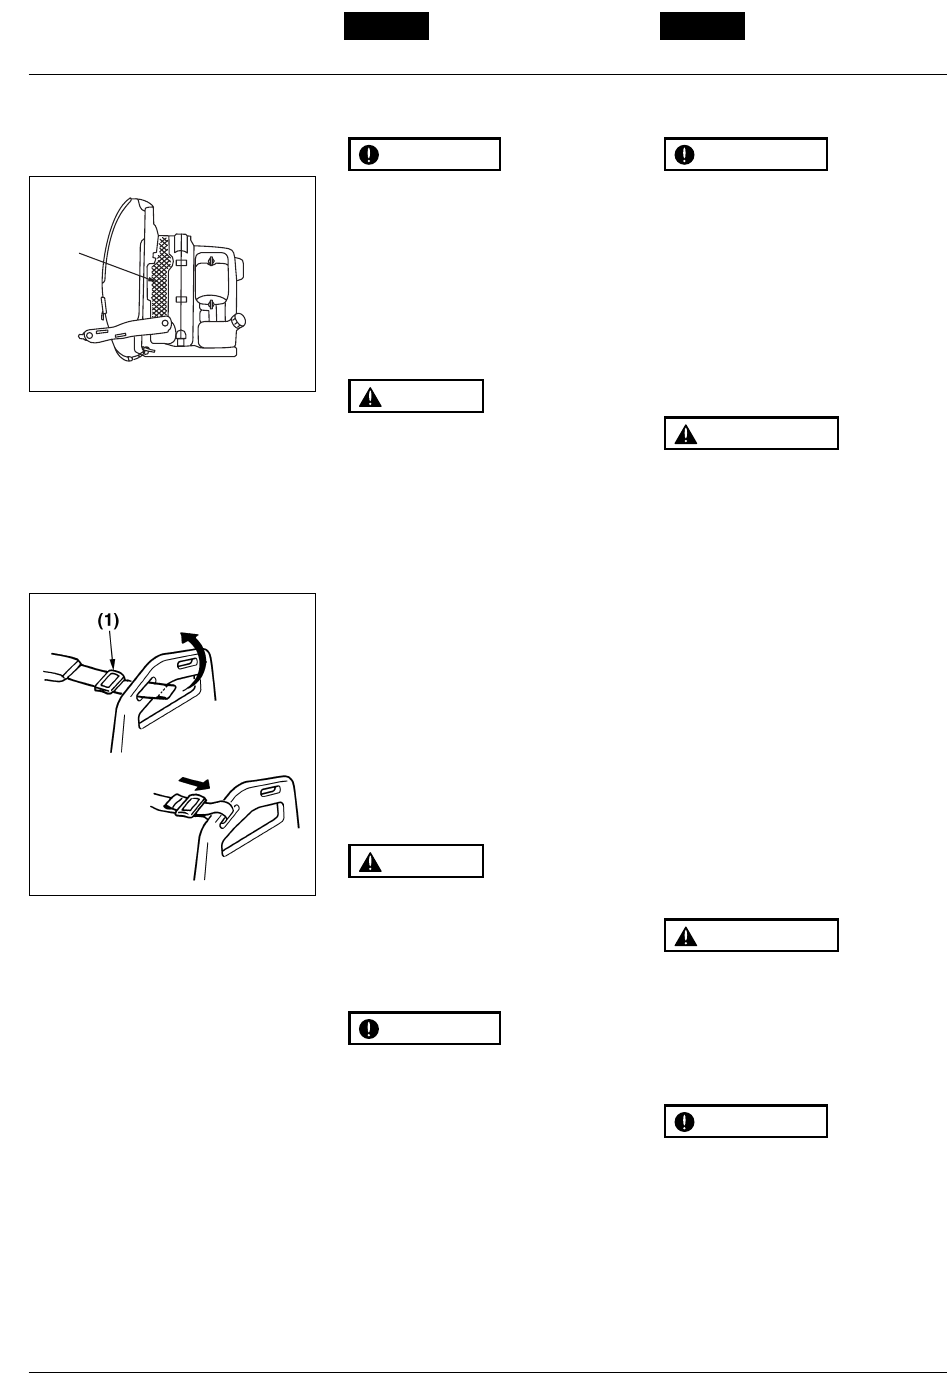
■ AIR INLET NET
• Blowing air is taken in from the air inlet
net. When air flow has dropped down
during operation, stop the engine and
inspect the air inlet net for blocking by
obstacles.
• Note that failure to remove any such
obstacles may result in the engine
becoming overheated and damaged.
(1) Net
Never use the blower without the net of
the blower. Before each use, check that
the net is attached in place and is free
from any damage.
■ SHOULDER STRAP
• If the shoulder strap is damaged it may
break during use, thus causing the
product to fall and resulting in personal
injury. Follow the instructions below to
replace the shoulder strap with new
one.
• Pass the upper end of the strap through
the hanger, making the FLAPPED SIDE
OUTSIDE.
• Put the end of the strap through the ring
on the strap, and then push the ring
toward the hanger as close as possible.
(1) Ring
The flap on the end of the strap works
as a stopper. Never install the strap
with the flapped side inside, or the unit
may fall from the operator, which could
result in injury to the operator and/or
damage to the unit.
Do not apply liquid type screw lock glue
on screws or bolts used to fix plastics
components. Adherence of this type of
glue may cause cracks on plastics and
end up with the breakage.
IMPORTANT
WARNING
WARNING
IMPORTANT
Maintenance
■ MALLA DE LA ENTRADA DE AIRE
•El aire expulsado por el soplador es
captado a través de la malla de la
entrada de aire. Cuando el flujo de aire
disminuya durante el uso del soplador,
apague el motor e inspeccione la malla
de la entrada de aire para determinar si
está obstruida.
• Tenga presente que si no retira los
obstáculos que obstruyen la malla, el
motor podrá recalentarse y dañarse.
(1) Malla
Nunca utilice el soplador sin la malla
instalada. Antes de cada uso,
compruebe que la malla esté instalada
y que no esté dañada.
■ CORREA PARA EL HOMBRO
• Si la correa para el hombro está
dañada, ésta puede romperse durante
el uso del soplador, causando la caída
del producto y eventuales lesiones a su
persona. Para reemplazar la correa
para el hombro por una nueva, siga las
instrucciones que se dan a
continuación.
• Pase el extremo superior de la correa a
través del colgador, asegurándose de
que el LADO CON LA ALETA QUEDE
HACIA FUERA.
• Pase el extremo de la correa a través
del aro de la misma, y luego empuje el
aro hacia el colgador, lo más que
pueda.
(1) Aro
La aleta en el extremo de la correa
funciona como tope. Nunca instale la
correa de manera que el lado de la
aleta quede hacia el interior; de lo
contrario, el soplador podrá caerse,
causando lesiones al operador y/o
daños al mismo.
No aplique adhesivo de fijación de rosca
líquido a los tornillos o pernos usados
para asegurar los componentes plásticos.
La adherencia de este tipo de adhesivos
puede causar grietas en los plásticos, y su
posterior ruptura.
IMPORTANTE
ADVERTENCIA
ADVERTENCIA
IMPORTANTE
Mantenimiento
(1)
F19
F20
21


