


1211
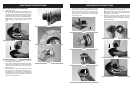
REPLACE THE SPOOL OF NYLON LINE
1. Unplug the trimmer.
2. Remove the spool assembly from the trimmer. To do
so, hold the outer ribbed part of the assembly with
one hand, while pushing down and turning the spool
head with the other to unlock it. (Fig. 18 & Fig. 19) The
spool carrier and spool will now disassemble easily.
NOTE: There is a spring inside the spool head that
could easily be lost. Ensure that it is put in a safe
place.
3. Remove the clear plastic line retaining ring. Remove
any existing line from the spool.
4. Using 0.065" replacement line measure off approxi-
mately 14' of line. Double over the cutter line into two
equal lengths and place loop in slot of the spool
divider (Fig. 20).
5. Wind the line onto the spool by turning the spool. The
line should go on in the direction of the arrow (A) on
the spool (Fig. 21). Line should be wrapped tightly
around the spool. The line is wound with each half
separated by the divider. Tightly wind it until there is
about 6" of line left (Fig. 22).
MAINTENANCE INSTRUCTIONS
6. Lock the ends of the line in opposite slots on the
spool (Fig. 23). Place the clear plastic line retainer
back over the line and spool (Fig. 24). Pull the lower
line up into the lower slot in the clear plastic line
r
etainer (Fig. 25). Pull the upper line down into the
upper slot (Fig. 26).
7. Insert the line through each eyelet in the spool carrier
and slide the spool into the carrier. (Fig. 27)
NOTE: Ensur
e that the line is within the clear plastic
line retainer. If it's outside of the clear plastic line
r
etainer, the line will not feed.
8. Make sure to insert the spring, assemble the spool
and spool carrier back onto the trimmer. To do so,
push the head on and turn it clockwise until it locks.
(Fig. 28 and Fig. 29)
MAINTENANCE INSTRUCTIONS
Fig. 18
Fig. 19
Fig. 20
Fig. 21
Fig. 22
A
Fig. 23
Fig. 24
Fig. 25
Fig. 26
Fig. 27
Fig. 28
Fig. 29