


11
SECTION 7: OPERATION
Warning:
Observe all warning labels on the snow thrower prior to use. See Section 1.
FUEL MIXTURE
Important:
Mix oil with gasoline
as instructed in the Oil and Fuel Recommendations Section in the separate
Engine Operator’s Manual
packed with your snow thrower. Read and follow all instructions carefully.
BEFORE STARTING ENGINE
Read the
Engine Operator’s Manual
carefully in its entirety before attempting to operate the machine. Be
completely familiar with the controls and the proper use of the engine before operating the unit. Keep both
Operator’s Manuals in a safe place for future and regular use.
STARTING THE ENGINE
To start the engine on your snow thrower, follow the
Starting Instructions
in the
Engine Operator’s Manual
.
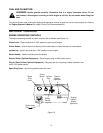
OPERATING THE SNOW THROWER
1. Start the engine as instructed in the Engine Operator’s Manual.
2. Adjust the discharge chute up or down as desired. Then use the chute crank to position the discharge to
discharge snow with the wind. Do not throw snow toward a building as hidden objects could be discharged
with enough force to cause damage.
3. Making certain no bystanders or obstacles are in front of the unit, engage the auger control handle. As the
snow thrower starts to move, maintain a firm hold on the handle, and guide the snow thrower along the path
to be cleared.
4. Release the auger control handle to stop the snow throwing action and forward motion.
TO STOP THE ENGINE
1. Run the engine for a few minutes before stopping to help dry any moisture on the engine.
2. To stop engine: Turn ignition key to OFF position and remove it from the snow thrower.
NOTE:
Do not lose ignition key. Keep it in a safe place. Engine will not start without the ignition key.
3. Wipe all snow and moisture from the unit. Move the choke lever back and forth several times and leave in the
ON position.
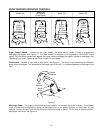
OPERATING TIPS
1. For most efficient snow removal, remove snow immediately after it falls.
2. Discharge snow downwind whenever possible. Slightly overlap each previous cleared path.
3. Lifting up on the handle will allow the rubber on the augers to propel the snow thrower forward. Pushing
downward on the handle will raise the augers off the ground and stop the forward motion.
NOTE:
Excessive upward pressure on the handle will result in premature wear on the rubber auger blades
which would not be covered by warranty.
4. Run the engine for a few minutes before stopping to help dry any moisture on the engine.
5. Clean the snow thrower thoroughly after each use.
6. It is not recommended that you operate this snow thrower on gravel as loose gravel can be easily picked up
and thrown by the auger, causing an injury or damage to the snow thrower.