


WARNING
page 11
TIME YOU REMOVE THEM. YOU MUST USE
NEW "HAIR" PINS IF THE OLD ONES ARE
WORN OR BENT. After getting the mower to
track straight readjust the neutral adjustment
knobs at the rear of the mower, if necessary. It is
normal to need to make these adjustments from
time to time.
How to Test/Use the Blade Clutch/
Brake Switch
Before testing the blade clutch/brake operation
make sure the area is clear and there is nothing
vulnerable to thrown objects from under the
mower. No one should be near the mower deck
or in its line of discharge. The discharge chute
deflector should be in the down position. The
parking brake should now be applied. Move the
engine throttle to the highest RPM speed set-
ting. (When mowing, the engine speed should
always be at its highest setting. The engine
governor will regulate the engine according to
the different mowing conditions at that setting.)
Stand on the foot platform and turn on the blade
clutch switch. Run blades for a minute or so. Try
engaging and disengaging the blades a few
times about 10 seconds apart. If the blades do
not start and stop in a few seconds each time,
service the blade brake system. Under mowing
load, the clutch's longevity will be the greatest at
the highest RPM setting.
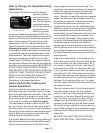
How to Test the Operator Presence
Control (OPC) Switch
With the parking brakes applied and the blades
ON, try stepping off the foot platform to test the
Operator Presence Control switch (OPC). The
engine should kill and the blades should stop
within a few seconds. If not, service the OPC
system.
Service and Adjustments
Tire Maintenance and Pressure
Excessively worn tire tread is dangerous on all
hills. Replace drive tires with less than
3/32" of any tread groove left. Use tires with the
tread pattern recommended by Wright Mfg., Inc.
only. Keep the tire pressure in the drive tires
between 8 and 12 psi. Higher pressures will
cause the tires to have less traction which will
force you to go slower and with less safety and
give you a harder ride. Keep the tire pressure in
the front caster tires between 35 and 46 psi.
Higher pressures will help keep the caster tires
on their rims when impacted from the side but
give a harder ride. They do not have any tread
but should be replaced when excessively worn.
Hydraulic Motor Support Adjustment
The various holes in the tractor frame and the
hydraulic motor supports may be used to make
a fine forward/rearward adjustment to the
balance of the Stander. This adjustment should
always be made in combination with the coarse
height-of-cut adjustment and anti-tip roller ad-
justment as described below. When the motor
supports are set in the forward position, the
Stander will be balanced lighter in the front than
when set in the rearward position, giving more
traction to the drive tires. Heavy operators (over
250 lbs. or so) may find that the rearward
position helps keep the front of the mower
down.
Blade Adjustments and Height-of-Cut
Before Adjusting the Height-of-Cut be sure of
proper air pressure in all four tires and check for
even tire wear. The height-of-cut can be ad-
justed the following ways:
Coarse Adjustment: For the coarse adjust-
ment the rear wheels, the front casters and
the anti-tip rollers should be adjusted at the
same time. Adjust the rear wheel motor
supports equally in one of the three settings
up or down 0.75" each in a 1.5" total range.
a. Use the highest holes in tractor frame
for cutting heights of 1.75" - 3.0".
b. Use the middle holes in tractor frame
for cutting heights of 2.5" - 3.75",
factory setting.
c. Use the lowest holes in tractor frame
for cutting heights of 3.25" - 4.5".
The anti-tip rollers at the back end of the
mower must be adjusted to correspond to
the above holes used for the coarse
wheel motor support adjustment:
There are four holes in the anti-tip roller
support brackets. Use the rearward holes