


Owner Service 19
MAN0475 (9/21/2005)
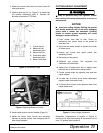
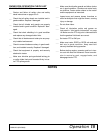
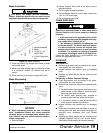
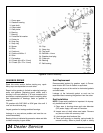
Blade Installation
Your dealer can supply genuine replacement
blades. Substitute blades may not meet original
equipment specifications and may be dangerous.
Figure 14. Blade Assembly
1. Place cap screws (3) through outer holes in blade
and spindle shaft.
2. Make sure blade cutting edge is positioned to lead
in a clockwise rotation, as viewed from top of
mower.
3. Place locknuts (4) on screws, torque to 84 lbs-ft.
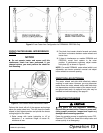
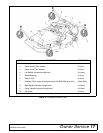
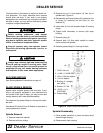
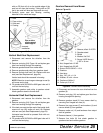
Blade Sharpening
Figure 15. Blade Sharpening
NOTICE
■ When sharpening blades, be sure to balance
them. Unbalanced blades will cause excessive
vibration which can damage blade spindle bear-
ings. Vibration may also cause structural cracks in
mower components.
1. Remove blades.
2. Always sharpen both ends at the same time to
maintain balance.
3. Follow original sharpening pattern.
4. Do not sharpen blade to a razor edge. Leave from
1/32" to 1/16" blunt edge.
5. Do not sharpen back side.
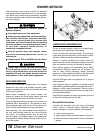
CHAIN SHIELDING
Full chain shielding must be installed when
operating in populated areas or other areas where
thrown objects could injure people or damage
property.
• If this machine is not equipped with full chain
shielding, operation must be stopped when any-
one comes within 300 feet (92 m).
• This shielding is designed to reduce the risk
of thrown objects. The mower deck and protec-
tive devices cannot prevent all objects from
escaping the blade enclosure in every mowing
condition.
It is possible for objects to ricochet
and escape, traveling as much as 300 feet (92 m).
Check that chain shielding is in good condition and
replace any damaged chain links.
CLEANING
After Each Use
● Remove large debris such as clumps of dirt, grass,
crop residue, etc. from machine.
● Inspect machine and replace worn or damaged
parts.
● Replace any safety decals that are missing or not
readable.
Periodically or Before Extended Storage
● Clean large debris such as clumps of dirt, grass,
crop residue, etc. from machine.
● Remove the remainder using a low-pressure water
spray.
1. Be careful when spraying near scratched or torn
safety decals or near edges of decals as water
spray can peel decal off surface.
2. Be careful when spraying near chipped or
scratched paint as water spray can lift paint.
3. If a pressure washer is used, follow the advice
of the pressure washer manufacturer.
● Inspect machine and replace worn or damaged
parts.
● Sand down scratches and the edges of areas of
missing paint and coat with Woods spray paint of
matching color (purchase from your Woods
dealer).
● Replace any safety decals that are missing or not
readable (supplied free by your Woods dealer).
See Safety Decals section for location drawing.
CAUTION
1. Spindle assembly
2. Blade
3. 1/2 NC x 1-1/2
HHCS GR5
4. 1/2 NC Flange lock
nut