


4
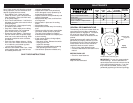
IV. GENERAL SERVICE
• Never run a machine inside a closed
area.
• Never make adjustments or repairs with
the motor running.
• Keep nuts and bolts, especially blade
attachment bolts, tight and keep equip-
ment in good condition.
• Never tamper with safety devices.
Check their proper operation regularly.
• Keep machine free of grass, leaves, or
other debris build-up. Allow machine to
cool before storing.
• Stop and inspect the equipment if you
strike an object. Repair, if necessary,
before restarting.
• Never attempt to make wheel height
adjustments while the motor is running.
• Always unplug electric mowers before
adjusting, cleaning or repairing.
• Grass catcher components are subject
to wear, damage, and deterioration,
which could expose moving parts or
SAFETY RULES
allow objects to be thrown. Frequently
check components and replace with
manufacturer’s recommended parts
when necessary.
• Mower blade is sharp and can cut. Wrap
the blade or wear gloves, and use extra
caution when servicing it.
• Do not attempt to change the motor’s
electronic settings or over speed the
motor.
• Maintain or replace safety and instruc-
tion labels, as necessary.
• Only use accessories or parts approved
by the manufacturer. Non-approved
parts or accessories can cause serious
injury or damage and will void the war-
ranty.
• This lawnmower is not to be used for
commercial use; Use only on personal
property. It should only be used on
private lawns and should not be used to
cut public parks, playing fi elds, farms,
forests or a large number of lawns.
ASSEMBLY
TO REMOVE MOWER FROM CARTON
• Remove all loose parts from carton.
• Remove lawn mower hous ing with care. Avoid touch ing blade under hous ing. Always
wear gloves or other protection when working under or lifting mower.
CAUTION: Do not operate this lawn mower without the discharge guard or an entire
approved grass catcher in place. These guards are for your protection and are required by
the American National Standards Institute and Consumer Products Safety Com mis sion.
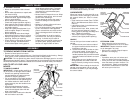
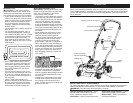
HOW TO SET UP YOUR LAWN
MOW ER
TO UNFOLD HANDLE
IMPORTANT: Unfold handle carefully so
as not to pinch or damage control cables.
• Remove any packing material which
may be between the upper and lower
handles for shipping purposes.
• Pull up and back on the upper handle to
raise the handle into the operating posi-
tion. Make certain the lower handle is
seated securely into the handle mount-
ing bracket.
• Align the holes between the upper
handle and lower handles. Insert the
cam locks and tighten them with the
wing nuts provided.
• Secure the lower handle to the bracket
with the knob on each side.
MOWING
POSITION
Lower handle
LIFT
UP
Operator
presence
control bar
Upper
handle
LIFT
UP
Cam lock
Handle knob
Wing nut
13
STORAGE
Immediately prepare your lawn mower for storage at the end of the season or if the unit
will not be used for 30 days or more.
EXTENSION CORD
• Wipe extension cord to remove any
foreign substances such as oil or stains.
IMPORTANT: Replace extension cord if
cut or damaged in any way.
• Wind cord in a series of equal loops to
prevent it from tangling.
OTHER
• If possible, store your unit indoors and
cover it to protect it from dust and dirt.
• Cover your unit with a suitable pro tec tive
cover that does not retain mois ture. Do
not use plastic. Plas tic cannot breathe,
which allows con den sa tion to form and
will cause your unit to rust.
LAWN MOWER
When lawn mower is to be stored for a pe-
riod of time, clean it thor oughly, remove all
dirt, grease, leaves, etc. Store in a clean,
dry area.
• Clean entire lawn mower (See “CLEAN-
ING” in the Maintenance section of this
manual).
• Lubricate as shown in the Main te nance
section of this manual.
• Be sure that all nuts, bolts, screws, and
pins are securely fas tened. Inspect
moving parts for damage, breakage and
wear. Replace if necessary.
• Touch up all rusted or chipped paint
surfaces; sand lightly before painting.
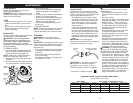
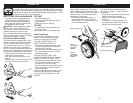
HANDLE
You can fold your lawn mower han dle for
storage.
1. Loosen the two cam locks on sides of
the upper handle and allow handle to
fold down to the rear.
2. Loosen the two handle knobs on sides
of the lower handle, lift the sides of
the lower handle past the edges of the
handle brackets and pivot entire handle
as sem bly forward and allow it to rest on
mower.
• When setting up your handle from the
storage position, the lower han dle will
require manually locking into the mowing
position.
IMPORTANT: When folding the handle for
storage or transportation, be sure to fold
the handle as shown or you may damage
the control cables.
FOLD
FORWARD
FOR
STORAGE
MOWING
POSITION
Lower handle
Operator
presence
control bar
Upper
handle
Cam lock
Handle knob