


11
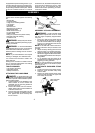
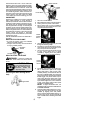
S WHEN BLADE THRUST OCCURS --
Blade Thrust can occur without warning if
the blade snags, stalls, or binds. This is
more likely to occur in areas where it is
difficult to see the m aterial being cut. By
using the unit properly, the occurrence of
blade thrust will be reduced and the
operator will be less likely to lose control.
S Cut onlygrass,weeds,andwoody brushup
to 1/2 inch (1 c m)in diameter w ith theweed
blade. Do not let the blade contact material
it cannot cut such as stumps, rocks,
fences, metal, etc., or clusters of hard,
woody brush having a diameter greater
than 1/2 inch (1 cm).
S Keep the blade sharp. A dull blade is more
likely to snag and thrust.
S Cut only at full throttle. The blade will have
maximum cutting powerand is less likely to
bind or stall.
S “Feed” the blade deliberately and not too
rapidly.The bladecan thrust away if i t is f ed
too r apidly.
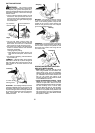
S Cut only f rom yo ur l eft t o your r igh t. Cut tingon
right side of the shield will throw debris away
from th e o perato r .
S Use the shoulder strap and keep a firm grip
on the unit with both hands. A properly
adjusted shoulder strap will support the
weight of the unit, freeing your arms and
hands to control and guide the cutting motion.
S Keep feet comfortably spread apart and
braced for a possible sudden, rapid thrust of
unit. Do not overreach. Keep firm footing and
balance.
S Keep blade below waist level; it will be
easier to maintain control of unit.
S Do notraise t heengineaboveyour waist as
the blade can come dangerously close to
your body.
S Do not swing unit with such force that you
are i n danger of losing your balance.
Bring the engine to cutting speed before enter-
ing the material to be cut.If the blade does not
turn when yousqueeze the throttle trigger , m ake
sure shaft is fully inserted into the engine.
Always release the throttle trigger and allow
engine to return to idle speed when not cut-
ting. The blade should not turn while the en-
gine isrunning atidle. Ifthe bladeturns a tidle,
do not use your unit. R eferto the C ARBURE-
TOR ADJUSTMENT section or contact your
authorized service dealer.
S Maintain good firm footing while using the
unit. Do t his by planting feet firmly in a
comfortable apart position.
S Cut while swinging the upper part of your
body from left to right.
S Asyoumoveforwardtothenextareatocut,
be sure to maintain your balance and footing.
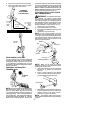
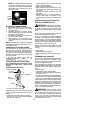
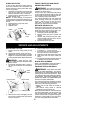
Cut using the 2
o’clock to 4 o’clock
position of the
blade
2 o’clock
4 o’clock
RECOMMENDED CUTTING POSITION
WARNING: T he operator or others
must nottryto clearaway cut material w iththe
engine running or the blade turning to avoid
serious injury. Stop engine and blade before
removing materials wrapped around blade or
shaft.
MAINTENANCE
WARNING: Disconnect t he spark
plug before performing maintenance except
for carburetor adjustments.
HELPFUL TIP
IMPORT ANT: Have all
repairs other than the rec-
ommended maintenance
described in the instruction
manual p erformed by an
authorized service dealer .
If any dealer other than an authorized
service dealer performs work on the
product, Electrolux Home Products,
Inc., may not pay f or repairs under war-
ranty. Itisyourresponsibility tomaintain
and perform general maintenance.
CHECK FOR LOOSE
FASTENERS AND PARTS
S Spark Plug Boot
S Air Filter
S Housing Screws
S Assist Handle Screw
S Debris Shield
CHECK FOR DAMAGED OR
WORN PARTS
Contact an authorized service dealer for re-
placement of damaged or worn parts.
S ON/OFF Switch -- Ensure ON/OFF switch
functions properly by moving the switch to
the OFF position. Make sure engine stops;
then restart engine and continue.
S Fuel Tank -- Discontinue use of unit if fuel
tank shows signs o f damage or leaks.
S Debris Shield -- Discontinue use of unit if
debris shield is damaged.
INSPECT AND CLEANUNIT ANDDE-
CALS
S After each use, inspect complete unit for
loose o rdamaged parts. Clean theunit and
decals using adamp c lothwitha milddeter-
gent.
S Wipe off unit with a clean dry cloth.