


5
ASSEM BLY
WARNING: If received asse mbled,
repeat allsteps toensureyour unit isproperly
asse mbled and all fasteners are secure.
Examine parts for dam age. Do not use dam-
aged parts.
NOTE: If you need assistanceor find parts
missing or damaged, call 1-800-554-6723.
It is normal for the fuel filter to rattle in the
empty fuel tank.
Finding fuelor oil residue onmuffler is nor m al
due t o carburetor adjustments and t esting
done by the manufacturer.
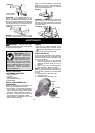
SHAFT ASSEMBLY
CAUTION:
When assembling shaft, place
the unit on a f lat surf ace for stability.
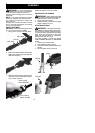
1. Align grooves on upper and lower shafts.
Upper Shaft
Lower Shaft
Grooves
2. Push th e two shaf ts toge ther until the lower
shaft is full y seated in the upper shaft (th e
shaft s lock i nto place).
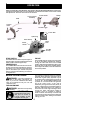
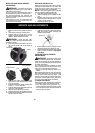
3. Slidelowerlockingsleeveassemblyover
upper locking sleeveassembly andtight-
en by turning clockwise.
Upper Locking
Sleeve Assembly
Lower Locking
Sleeve Assembly
NOTE: If locking sleeve assembly will not
tighten, the shafts are not fully seated.
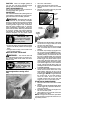
ADJUSTING THE HANDLE
WARNING: Whenadjustingth e a ssist
handle, besure itremains abovethe safety label
and below the mark or arrow on the shaft .
1. Loosen wing nut on handle.
2. Rotate th e handle on the shaft to an upright
position; re tighten wing nut.
ATTACHING SHIELD
WARNING: The shield must be prop-
erly installed.The sh i eldprovi de s partial p rotec-
tion fromthe risk of thrown objects t o the opera-
tor and others and is equipped w ith a line limiter
blade wh ich cuts excess l ine to the proper
length. The lin e limiter blade (on underside of
shield) is sharp and can cu t you.
For proper ori entation of shield, see K NOW
YOUR TRI MMER i llustration in OPER ATI ON
section.
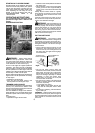
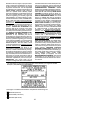
1. Remove wing nut from shield.
2. Insert bracket into slot as shown.
3. Pivo t shield untilbolt passe s through holein
bracket.
4. Secur ely tighten wing nut onto bolt.
Wing Nut
Bracket
Shield
Slot