


10
MUFFLER AND SPARK ARREST-
ING SCREEN
WARNING: The muf fler on this prod-
uct conta ins chemicals known to the State of
California to ca use cancer.
As your unit isused , carbondepositsbuild up
on the muffler and spark arresting screen.
For normal homeowner use, how ever, the
muffler andspar k a rresting scr eenwillnot re-
quire any service.
After 50 hours o f use, we recommend that
your muffler be serviced or replaced by you r
authorized service dealer.
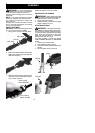
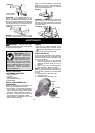
REPLACE SPARK PLUG
Replace the spark plug each year to ensure
the engine starts easier and runs better. Set
spark plug gap at 0.025 inch (0.6 mm). Igni-
tion t im ing is fixed and nonadjustable.
NOTE: This sp ark ignition system complies
with the Canadian st andard ICES--002.
1. T wist, then pull off spark plug boot.
2. Remove spark plug fr om cylin der and dis-
card .
3. Replace with Champion RCJ-6Y spark
plug and tighten securely with a 3/4 inch
(19 mm) socket wrench.
4. Reinst all the spark plug boot.
SERVICE AND ADJUSTMENTS
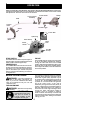
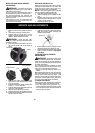
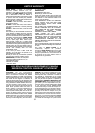
LINE REPLACEMENT
1. Remove spool by firm ly pulling o n tap but-
ton.
2. Clean entire surf ace of hub and spool.
3. Replace with pre--wound spool, or cut a
length of 1 8 f eet of 0.065 inc h (1. 65 mm)
diameter WEED EATER brand line.
WARNING: Never use wire, rope,
string,etc., whichcanbreakoffandbecomea
dangerous missile.
4. Insert one end of the line about 1/2 inch (1
cm) into the sm all hole on the in side of
spool.
Hub
Small Hole
Spool
Line exit hole
Line in Notch
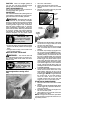
5. Wind the line evenly and tightly onto the
spool. Wind in the direction of t he arrow
found on the spool.
6. Push theline i nto thenotches, leaving3 to5
inches (7 -- 12 cm) unwoun d.
7. Insert th e lines into t he exit h oles in thehub
as shown in the illustr ation.
8. Align the notch with the line exit hole.
9. Push spoolinto hub u ntil itsna ps intopl ace.
10. Pu ll the line exte nding outsi de of t he h ub to
release it from the notch.
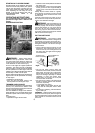
REPLACING THE TRIMMER HEAD
1. Hold the dustcupwi tha wrenchto keepth e
shaft fr om turning while removing and
installi ng trimmer head.
Dust Cup
2. Remove trim mer head by tu rning counter-
clockwise (looking f rom bottom of unit).
3. Thread replacement trimmer head onto the
shaft by turning clockwise. Onl y tig hten
hand tight!
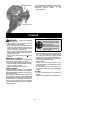
CARBURETOR IDLE SPEED
ADJUSTMENT
WARNING: Keep others away when
making idle speed adjustments. The trimmer
head will be spinning during this procedure.
Wear your protective eq uipmentand o bserve
all sa fety precautions.
The carburetor has been carefully set at the
factory. Adjustments maybenecessary ifyou
notice any of the following conditions:
S Engine will not idl e when t he throttle i s re-
leased .
Make adjustments with the unit support edso
the cutt ing attachment is off the ground and
will not make contact with any object. Hold
theunit byhand whilerunningandmakingad-
justments. Keep all parts of your body away
from the cutting attachment and muffler.
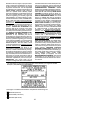
To adjust idle speed:
Allow enginetoidle. Adjustspeeduntilengine
runs without stalling (idle speed too slow).
S Turn idle speed screw clockwise to in-
creaseenginesp eedif enginestallsordies.
S Turn idle speed screw counterclockwiseto
decrease engine speed.