


-- 6 --
NOTE: Keep the throttle lock engaged until
the engine starts.
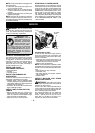
5. Pull starter rope sharply until engine runs,
but no more than 5 pulls.
6. Allow the engine to run 10 seconds, then
move the choke lever to the OFF CHOKE
position.
7. Releasethethrottlelockby squeezingand
releasing the trigger.
NOTE: If engine has not started, pull starter
rope5morepulls.If enginestill doesnot run,it
is probably flooded. Proceed toSTARTING A
FLOODED ENGINE.
STARTING A FLOODED ENGINE
Flooded engines can be started by placing
theON/OFF switchinthe ONposition andthe
choke lever in the OFF CHOKE position and
engaging the throttle lock as directed in the
STARTING A COLD ENGINE section; then,
pull the rope to clear the engine of excess
fuel. Sta rti ng could requi re pull ing the star ter
rope many times depending on how badly the
unit is flooded. If the unit still doesn’t start, refer
to the TROUBLESHOOTING T ABLE or call
1-800-554-6723.
SERVICE
WARNING: Ensure ON/OFF switch
is in the OFF position and disconnect the
spark plug before performing maintenance
except for carburetor adjustments.
HELPFUL TIP
IMPORTANT: Have all
repairs other than the rec-
ommended maintenance
described in the instruction
manual performed by an
authorized service dealer.
If any dealer other than an authorized
service dealer performs work on the
product,WEED EA TERmay not pay for
repairs under warranty. It is your re-
sponsibility to maintain and perform
general maintenance.
GENERAL RECOMMENDATIONS
Thewarranty onthisunit doesnot coveritems
that have been subjected to operator abuse
or negligence. To receive full value from the
warranty, the operator must maintain unit as
instructed in this manual. V arious adjust-
ments will need to be made periodically to
properly maintain your unit.
CHECK FOR LOOSE
FASTENERS AND PARTS
S Spark Plug Boot
S Air Filter
S Housing Screws
CHECK FOR D AMA GED OR
WORN PARTS
Contact an authorized service dealer for re-
placement of damaged or worn parts.
S ON/OFF Swi t ch -- En su re ON/ OFF switch
functions properly by moving the switch tothe
OFF position. Make sure engine stops; then
restart engine and continue.
S Fuel Tank -- Do not use unit iffuel tank shows
signs of damage or leaks.
INSPECT AND CLEAN UNIT AND
LABELS
S Before and after each use, inspect com-
plete unit for loose or damaged parts. After
each use, clean the unit and labels using a
damp cloth with a mild detergent.
S Wipe off unit with a clean dry cloth.
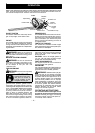
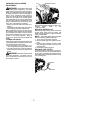
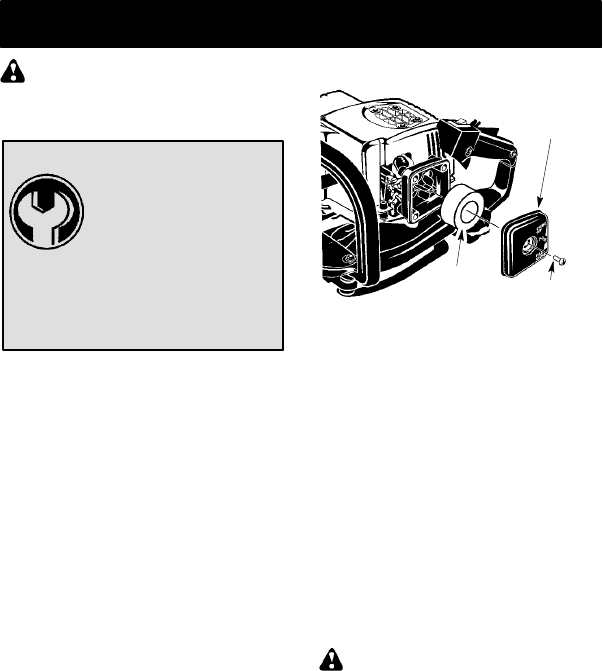
CLEAN AIR FILTER
Air Filter
Cover
Screw
Air Filter
Cleaning the air filter:
A dirty air filter decreases engine perform-
ance and increases fuel consumption and
harmful emissions. Always clean after every
5 hours of operation.
S Clean the cover and the area around it to
keep debris from falling into the carburetor
chamber when the cover is removed.
S Remove parts as illustrated.
NOTE: Donotcleanfilter ingasolineorother
flammable solvent. Doing so can create a fire
hazard or produce harmful evaporativeemis-
sions.
S Wash the filter in soap and water.
S Allow filter to dry.
S Add a few d rops of oil to the filter; squeeze
filter to distribute oil.
S Replace parts.
INSPECT MUFFLER AND SPARK
ARRESTING SCREEN
WARNING: The m uffler on this prod-
uct contains chemicals known to the State of
California to cause cancer .
As your unit is used, carbon deposits buildup
onthe mufflerand spark arresting screenand
must be removed to avoid creating a fire haz-
ard or affecting engine performance.
For normal homeowner use, the muffler and
spark arresting screen will not require any
service. After 50 hours of use, we recom-
mend that your muffler be serviced or re-
placed by an authorized service dealer.