


22
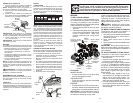
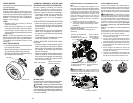
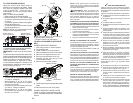
Fender
Battery
Battery
Bracket
1. Lift seat for bolt access.
2. Disconnect BLACK battery cable then
RED battery cable.
3. Remove battery bracket bolt.
4. Install new battery with terminals facing
to the right, and away from seat as
shown.
5. Reinstall battery bracket and bolt.
6. First connect RED battery cable to posi-
tive (+) battery terminal.
7. Connect BLACK grounding cable to
negative (-) battery terminal.
INTERLOCKS AND RELAYS
Loose or damaged wiring may cause your
riding mower to run poorly, stop running, or
prevent it from starting.
• Check wiring. Make sure all wiring and
connectors are secure.
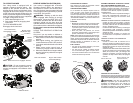
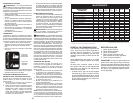
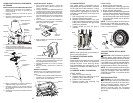
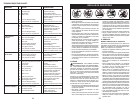
TO REPLACE FUSE
Replace with 4 amp. or 5 amp. automotive
type plug-in fuse. The fuse holder is located
under the fender.
ENGINE
Your engine speed has been factory set. Do
not attempt to increase engine speed or it
may result in personal injury. If you believe
that the engine is running too fast or too slow,
take your riding mower to a qualified service
center for repair and/or adjustment.
Your carburetor is not adjustable. If your
engine does not operate properly due to
suspected carburetor problems, take your
riding mower to a qualified service center
for repair and/or adjustment.
IMPORTANT: Never tamper with the engine
governor, which is factory set for proper en-
gine speed. Overspeeding the engine above
the factory high speed setting can be danger-
ous. If you think the engine-governed high
speed needs adjusting, contact a qualified
service center, which has proper equipment
and experience to make any necessary
adjustments.
31
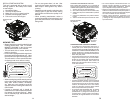
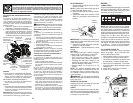
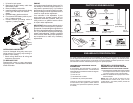
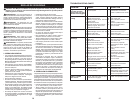
PARTES NO ENSAMBLADAS
)NSERTOªDELªVOLANTE
ª0ASADOR
#UBIERTAªDEªDIRECCIØN
6OLANTE
ª!RANDELAªPLANAª
!DAPTADORªDELªVOLANTE
ª!RANDELAªPLANAªGRANDE
ª#ONTRATUERCAª
ª#ONTRATUERCAª
ª0ERNOªHEXAGONALª
ªXªª
#UBIERTAªDELª
EJEªDEªDIRECCIØN
%JEªDEª
DIRECCIØN
!SIENTO
ª!RANDELA
ª0ERILLA
ª,LAVE
(OJAªDEªINCLINACIØN
Su nueva cortadora de césped se ha ensamblado en la fábrica con excepción de aquellas partes
que se dejan sin ensamblar para el envío. Para asegurar la operación segura y correcta de la corta-
dora de césped, todas las partes y la ferretería que usted en sam ble se deben apretar bien. Use las
herramientas correctas nec es arias para ase gurar un ajuste apropiado.
ENSAMBLADO/PREOPERACIÓN
HERRAMIENTAS NECESARIAS PARA EL
ENSAMBLADO
El ensamblado será más simple si cuenta con
un conjunto de llaves de cubo. Los tamaños de
llave estándar que necesita se indican en seguida.
(1) Llave de 3/4"
(1) Llave de 1/2"
(1) Herramienta de cuchilla
(1) calibrador de presión para llantas
Cuando se menciona la derecha o la izquierda
en este man ual, esto significa cuando usted se
encuentra en la po si ción de operación (sentado
a l vol ante).
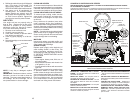
RETIRO DE LA CORTADORA DE
CÉSPED DE LA CAJA DE CARTÓN
DESEMPACADO DE LA CAJA DE CARTÓN
1. Corte las líneas punteadas de los cuatro paneles
de la caja de cartón. Retire la caja de cartón
y el marco superior como una sola pieza.
2. Retire los materiales de empaque de la corta-
dora de césped.
NOTA: Sólo corte la caja de cartón con una
herramienta de cuchilla corta, pues una de
cuchilla larga o una sierra pueden pinchar las
llantas de la unidad.