


-- 6 --
STARTING A FLOODED ENGINE
Flooded engines can be started by placing
theON/OFFswitchintheONpositionandthe
choke lever in the OFF CHOKE position and
engaging the throttle lock as directed in the
STARTING A COLD ENGINE section; then,
pull the rope to clear the engine of excess
fuel. Star ting c ould requ ir e pu lling th e sta rter
rope many times depending on ho w badly t he
unit is flooded. If the unit still doesn’t start, refer
to th e TROUBLESHOOTING TABLE or call
1-800-55 4-6723.
SERVICE
W ARNING:
Ensure ON/OFF switch
is in the OFF position and disconnect t he
spark plug before performing maintenance
except for carburetor adjustments.
GENERALRECOMMENDATIONS
Thewarrantyont hisunitdoesnotcoveritems
that have been subjected to operator abuse
or negligence. To receive full value from the
warranty, the operator must maintain unit as
instructed in this manual. Various adjust-
ments will need to be made periodically to
properly maintain your unit.
CHECK FOR LOOSE
FASTENERSAND PARTS
S
Spark Plug Boot
S
Air Filter
S
Housing Screws
CHECK FOR DAMAGED OR
WORN PARTS
Contact an authorized service dealer for re-
placement of damaged or worn parts.
S
ON/OFF Sw itch -- Ensure ON/OFF switch
functions prope rly bymovingtheswitch tothe
OFF position. Make sure eng ine stops; then
restart engine and continue.
S
Fuel Tank -- Donot useunit iffuel tank sho ws
signs o f d amage or leaks.
INSPECTAND CLEAN UNIT AND
LABELS
S
Before and after each use, inspect com-
pleteunitfor looseor damagedparts. After
each u se,clean theunit andlabels using a
damp cloth with a mild detergent.
S
Wipe off unit with a clean dry cloth.
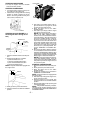
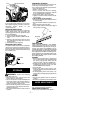
CLEAN AIR FILTER
Air Filter
Cover
Screw
Air Filter
Cleaning the air filter:
A dirty air filter decreases engine perform-
ance and increases fuel consumption and
harmful emissions. Always clean after every
5 hours of operation.
1. Clean the cover and the area around it to
keepdebrisfrom fallingintothecarburetor
chamber when the c over is removed.
2. Remove parts as illustrated.
NOTE:
Do not clean f ilter in gasoline or oth er
flammable solvent. Doing so can create a fire
hazard or produce harmful ev apora tive emis-
sions.
3. Wash the filter in soap and w ater.
4. Allow filter to dry.
5. Adda fewdropsofoil tothefilter;squeeze
filter to distribute oil.
6. Replace parts.
INSPECT MUFFLER AND SPARK
ARRESTINGSCREEN
NOTE:
THE SPA RK ARRESTING SCREEN
ON T HIS UNIT IS NOT SERVICEABLE.
For n ormal homeowner u se, the muffler and
spark arresting screen will not require a ny ser-
vice.
After 50 hours of use, we recommend that
your muf fler be replaced by an authorized
service dealer.
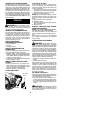
CARBURETOR ADJUSTMENT
W ARNING:
Keep others away when
making idle speed adjustments. The blade
will bemoving duringmost of this procedure.
Wearyour pr otectiveequipmentandobserve
all safety p recautions. When making adjust-
ments, use a screwdriver short enough to
keep your hands behind the handguard and
away from the blade. After making adjust-
ments,theblademustnotmoveatidlespeed.
The carburetor has been carefully set at the
factory.Adjustmentsmaybenecessaryifyou
notice any of the following conditions:
S
Engine will not idle when the throttle is re-
leased.
S
The blade moves at idle.
Keep others away when making idle speed
adjustments. Makeadjustmentswiththeunit
resting on a level surface free of debris that
can be caught in the hedge trimmer blade.
Serious injury to theoperatorand otherscan
occur if t he carburetor is not properly ad-
justed. Keepall partsofyourbody awayfrom
the blade andmuffler .
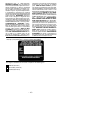
Idle Speed Adjustment
Allow engi netoidle. Adjustspeeduntilengine
runswithoutblademoving(idletoofas t)oren-
gine stalling (idle speed tooslow).
S
Turn idle speed screw clockwise to in-
creaseengines peedifenginestalls ordies.
S
Turnidle speedscrew counterclockwise to
decrease enginespeed if the blademoves
at idle.
W ARNING:
Recheck the idle speed
after each adjustment. The blade must not
move at i dle speed to avoid serious injury to
the operatoror others.