


6
SETTING THE EDGING DEPTH
WARNING:
Never attempt to adjust
the depth adjusting skid when the engine is
running. Always release the throttle trigger,
wait until the blade stops turning, move the
ON/OFF switch to the OFF position, and dis-
connect spark plug before making adjust-
ments. Your edger is equipped with several
edging depths. The depth used will depend
on your personal edging preference and the
condition of the area where the edging opera-
tion is to be done.
NOTE:
If t he area to be edged has never
been cut orseveral weekshave passedsince
the last cut, the first edging should be done at
no more than half depth.
To set the depth:
S
Move the depth control lever forward for
shallower edging.
S
Move the depth control lever backward for
deeper edging.
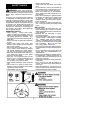
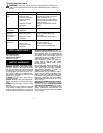
Support Arm
Depth
Adjusting
Skid
Depth C ontrol Lever
When edging, the trigger handle must be
raised until the skid rests on the ground. The
trigger handle must be held in the raised posi-
tion during the entire edging operation to
maintain a consistent edging depth.
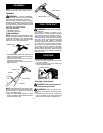
DEPTH ADJUSTING SKID
The surface of the depth adj usting skid will
wearoveraperiod oftime. This part isrevers-
ible to provide a second wear surface.
S
Remove the two mounting screws which
hold the skid to the support arm.
S
Rotate the skid 180 degrees.
S
Reinstall the mounting screws.
EDGING TIPS
S
Inspect unit before each use.
S
Inspect the area to be cut before each use.
S
Keep unit in front of your body.
S
Cut at full throttle.
S
Keep the wheels and skid in contact with
the ground.
S
Always work going away from others.
SERVICE
We recommend all service and adjustments
not listed in this manual be performed by an
authorized authorized service dealer.
CARBURETOR ADJUSTMENTS
Your carburetor is equipped with limiter caps.
Damage will occur if you turn the needles be-
yond the limiter caps. Carburetor adjustment
is a complicated task. We recommend that
you take yourunit toan authorized authorized
service dealer.
IGNITION TIMING
Ignition timing is fixed, nonadjustable.
SPARK PLUG
Replace the spark plug yearly using a Cham-
pion RCJ--8Y plug. Spark plug gap is 0.025”.
BLADE MAINTENANCE
WARNING:
The blade will continue to
spin after the engine stops or after the throttle
trigger has been released. Make sure the
blade has stopped coasting and disconnect
the spark plug before performing work on the
blade.
Always replace a blade that is bent, warped,
cracked, broken, or damaged in any other
way . Never attempt to straighten and reuse a
damaged blade. Use only specified replace-
ment blade.
S
The blade is reversible. When the cutting
edge on one side becomes worn, turn the
blade over.
S
Check blade for flatness periodically. Lay
the blade ona flat surface toinspect for flat-
ness. Throw away a blade that is not flat.
BLADE REPLACEMENT
WARNING:
Wear protective gloves
when handling orperforming maintenance on
the blade to avoid injury.
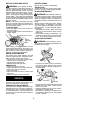
Blade
S
To remove the blade, insert a screwdriver
into the hole in the gearbox; then, remove
the nut (clockwise), washer and blade from
the blade shaft.
Nut
Washer
Flat sides
Hole
S
Align the flat area of the blade opening with
the flat side of the shaft. Place the new
blade on the shaft.
S
Install the washer and nut; turn nut counter-
clockwise o n the blade shaft.
S
Bind blade by inserting a screwdriver in to
the hole in the gearbox; then, firmly tighten
nut with a wrench.