


8
SERVICE AND ADJUSTMENTS
LINE REPLACEMENT
Pre--wound spools offer the most convenient
method for replacing line and ensuring opti-
mum performance.
S
Replacement spools are color--coded to
ensure use of the correct spool with your
unit. Besureto usethe samecolor spool as
the existing spool
.
NOTE:
Always cleardirt anddebris from cut-
ting head components when performing any
type of maintenance.
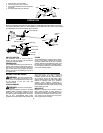
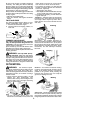
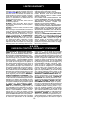
S
Hold spool and unscrew cap by turning in
the direction shown on top of the cap.
S
Remove line guide ring and spool.
Cap
Spool
Line guide ring
Use a pre--wound spool or refill spool with
line. If using a pre--wound spool, remove tape
strip from line and spool
.
REFILLING THE SPOOL WITH LINE
WARNING:
Use only 0.080” (2mm)
diameter round line. Other sizes and
shapes of line will not advance properly and
will result in improper cutting head function or
can cause serious injury. Do not use other
materials such as wire, string, rope, etc. Wire
can break off during cutting and become a
dangerous missile that can cause serious in-
jury.
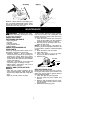
1. Cut a length of 30 feet of 0.080” (2 mm)
diameter round W eed Eater
"
brand line.
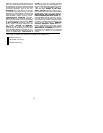
Feed line in
direction
shown on
spool.
Spool
2. Insert one end of line into center cavity of
empty spool. Ensure line will feed into
spool in the direction shown on the spool
(clockwise).
3. Continue feeding line into spool, leaving 4
-- 6 inches (10 -- 15 cm) unwound from
center of spool.
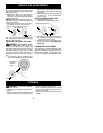
INSTALLING SPOOL WITH LINE
1. Install replacement spool.
2. Thread line through line guide ring.
Line through guide ring
Replacement Spool
Slot
3. Rest guide ring on spool and place line in
slot. Allow line to extend 4 -- 6 inches (10
-- 15 cm) from center of spool.
4. Ensure line remains in slot while screw-
ing cap on to the shaft. Only tighten cap
hand tight!
CARBURETOR ADJUSTMENT
Your carbur etor is equipped with limiter caps.
Carbur etor adjustment is a complicated task.
Werecom mendthat you takeyour unit to anau-
thorized service dealer. Damage will occur if
you tur n the needles beyond the limiter stops.
STORAGE
WARNING:
Perform the following
steps after each use:
S
Allow engine to cool before storing or trans-
porting.
S
Store unit and fuel in a well ventilated area
where fuel vapors cannot reach sparks or
open flames from water heaters, electric
motors or switches, furnaces, etc.
S
Store unit with all guards i n place. Position
unit so that any sharp object cannot acci-
dentally cause injury.
S
Store unit and fuel well out of the reach of
children.