


7
4. Before using the unit, tighten the knob se-
curely by turning clockwise.
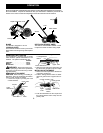
INSTALLING ATTACHMENT
HANGER
An attachment hanger is provided forstorage
when attachment is not in use.
To install hanger on attachment:
1. Remove the tube capfrom the attachment
(if present) and discard.
2. Press andhold the locking/release button.
3. Push hanger onto the attachment until the
locking/release button snaps into the hole.
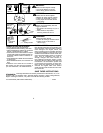
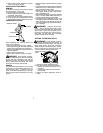
OPERATING POSITION
Heavy Shoes
Long Pants
Eye Protection
ALWAYS WEAR:
When operating unit, stand as shown and
check for the following:
S
Wear eye protection and heavy clothing.
S
Keep right arm slightly bent with right hand
holding the trigger handle of powerhead.
S
Keep left arm extended with left hand hold-
ing the handlebar.
S
Keep unit below waist level.
S
Adjust edger wheel for proper cut depth.
WARNING:
Never attempt to adjust
the edger wheel when the unit is in operation.
Always stop the powerhead, wait until the
blade stops turning, and disconnect thespark
plug (or disconnect powerhead from power
source) before making adjustments.
EDGING
Asyoubecomefamiliar withuseof youredger
attachment, you wi llbe ableto determine your
own operating pace. Conditions such as
depth of cut and material being cut will regu-
late the speed and time required for your edg-
ing job.
S
Allow theengine towarmup beforeyou begin
edging.
S
Increase the engine speed before p lacing the
blade in the cut. For best r esults, run the en-
gine at full thro ttle while cutting.
S
Always wor k going away from people and
solid objects such as walls, large stones,
trees, automobiles, etc.
S
Becarefulwhenedging neartreesorvaluable
plants. The high speed metal blade may cut
roots and cause damage to the plants.
S
If the blade stalls, immediately move the unit
backslightlytoallowthe bladeto r estart. Ifthe
blade continues to stall, stop the engine, dis-
connect thespark p lug, andinspect for block-
age or damage.
WARNING:
Keep the blade area
clean. Always release the throttle trigger,
move the powerhead ON/OFF switch to the
OFF position, disconnect the spark plug (or
disconnect powerhead from power s ource),
and make sure the blade has completely
stopped turning before cleaning.
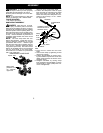
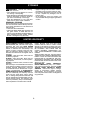
SETTING THE EDGING DEPTH
WARNING:
Never attempt to adjust
the cut depth when the engine is running. Al-
ways release the throttle trigger, wait until the
blade stops turning, move the powerhead
ON/OFF switch to the OFF position, and dis-
connect spark plug (or disconnect from pow-
er source) before making adjustments.
Depth Adjustment
Knob
1. Loosen the depth adjustment knob.
2. Slide the wheel to the desired position.
S
Raising the wheel will increase the cut-
ting depth.
S
Lowering the wheel will decrease the
cutting depth.
3. Tighten the depth adjustment knob se-
curely.