


6
5. For negative grounded vehicle, connect POSITIVE (RED) clamp from battery
charger to POSITIVE (POS, P, +) post of battery. Connect NEGATIVE (BLACK)
clamp to vehicle chassis or engine block away from the battery. Do not connect
clip to carburetor, fuel lines, or sheet metal body parts. Connect to heavy gauge
metal part of frame or engine block.
6. For positive-grounded vehicle, connect NEGATIVE (BLACK) clamp from battery
charger to NEGATIVE (NEG, N, -) ungrounded post of the battery. Connect POS-
ITIVE (RED) clamp to vehicle chassis or engine block away from battery. Do not
connect clip to carburetor, fuel lines, or sheet metal body parts. Connect to heavy
gauge metal part of frame or engine block.
7. When disconnecting charger, turn switches off, disconnect AC cord, remove
clamp from vehicle chassis, and then remove clamp to battery terminal.
8. See operating instructions for length of charge information.
9. Do not charge the battery while engine is operating.
CHARGING THE BATTERY IN A VEHICLE
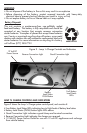
1. Check polarity of battery posts - For top-mounted battery posts, the Positive post
(marked POS, P, +) usually has a larger diameter than the Negative battery post
(marked NEG, N, -). For side-mounted battery terminals, the terminals are
marked Positive -red and Negative -black.
2. Attach charger clamps to battery connections, as follows, ensuring a good con-
nection (if there is a mistake, the Reverse Polarity Indicator will light): NEGATIVE-
GROUNDED VEHICLE: Connect the POSITIVE (RED) charger clamp to the POSI-
TIVE (POS, P, +) battery post.
3. Connect the NEGATIVE (BLACK) charger clamp to the vehicle chassis, or the
engine block (away from the battery). Do not connect the clamp to the carbure-
tor, fuel lines, or sheet-metal body parts: connect only to a heavy gauge metal
part of the frame or engine block.
NOTE: The NEGATIVE-GROUNDED system is the most common in today's
vehicles.
4. Set charger's Charge Rate 2/4/6 Amp to appropriate setting according to bat-
tery size.
5. Plug battery charger power cord into grounded AC power outlet and refer to
page 8 for approximate charging times.
6. When charging is completed, disconnect cables and clamps in reverse order from
which they were connected.
CHARGING THE BATTERY OUTSIDE A VEHICLE:
1. Check polarity of battery posts- For top-mounted battery posts, the Positive bat-
tery post (marked POS, P, +) usually has a larger diameter than the Negative bat-
tery post (marked NEG, N, –). For side-mounted battery terminal connections the
Positive terminal is red, the Negative terminal is black.
2. Attach a 24-inch (minimum length) #6 AWG insulated battery cable to the
Negative battery post (marked NEG, N, -).
3. Connect the Positive (RED) battery clamp to the Positive battery terminal (marked
POS, P, + or red).
4. Stand as far back from battery as possible, and do not face battery when mak-
ing final connection.