


7
ASSEMBLY INSTRUCTIONS
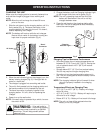
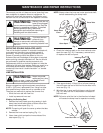
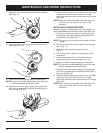
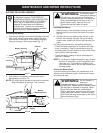
3. Plug the charger into the wall outlet and wind any
excess wire onto the cord wrap on the charging
station (Fig. 3).
Wall Outlet
Charging Station
Screws
Wall
Stud
Cord Wrap
Charger
Fig. 3
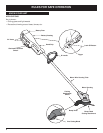
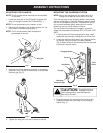
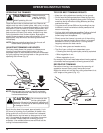
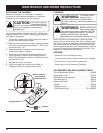
ADJUSTING THE D-HANDLE
NOTE: The D-handle comes mounted on the backside
of the shaft.
Fig. 1
Fig. 2
MOUNTING THE CHARGING STATION
NOTE: Mount the charging unit and allow the unit to
charge for at least 36 hours prior to first use.
This unit may stay on the charging station continuously
without overcharging. Place the charging station where
the unit is intended to be stored. This should be a cool,
dry and well ventilated place, where the unit can be
locked-up and out of the reach of children.
The unit should be stored and charged in a location
where the temperature is between 50˚F (10˚C) and 100˚F
(38˚C).
1. Locate a place for the charging station near a wall
outlet and high enough to keep the unit off the floor.
2. Locate the wall stud and mount the charging station
to the wall using the three (3) screws provided
(Fig 3). Make sure that the screws enter the wall stud
to provide a secure mount.
Charging
Indicator Light
1. Locate the wing nut on the D-Handle. Untighten the
wing nut enough to loosen the D-Handle (Fig. 1).
NOTE: Do not remove wing nut, washer, or bolt.
2. Rotate the D-Handle to the upright position on the
front side of the shaft housing (Fig. 1).
NOTE: The D-handle should slant towards the
powerhead of the unit.
3. Hold the unit in the operating position. If necessary,
reposition the D-handle to the location that provides
the best grip (Fig. 2).
Wing Nut
4. Tighten the wing nut until the D-Handle is secure.
To prevent injury or
damage to the unit,
the charging station must be mounted
securely to the wall.
CAUTION: