


14
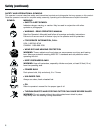
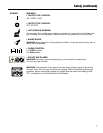
Maintenance (continued)
LINE INSTALLATION
This section covers both Membrane line and standard
single line installation.
Always use manufacturer’s 0.080 inch (2.03 mm)
replacement line. Line other than specified may make
the engine overheat or fail.
Never use metal-reinforced line, wire, chain, or
rope, etc. These can break off and become a
dangerous projectile.
There are two methods to replace the trimming line.
• Wind the inner reel with new line
• Install a prewound inner reel
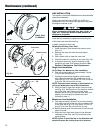
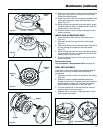
Winding the Existing Inner Reel
1. Press the tabs in and remove the bottom cover
(Fig. 6-1).
2. Remove the inner reel from the outer spool
(Fig. 6-2).
3. Use a clean cloth to clean the inner reel.
4. Check the pawl for cracking or pin wear (Fig. 6-3).
5. If the pawl shows any sign of cracking or has
excessive pin wear, then replace the pawl. See
Section 6, Maintenace, Pawl Replacement.
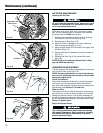
Single Line Installation
Go To Step 9 for Membrane Line Installation
6. Take two equal lengths of approximately 10 feet
(3 m) of new trimming line.
7. Holding the two pieces together with the ends
even,insert the lines into the slotted hole in the
inner reel (Fig. 6-4). Only about 1/2 inch of line will
fit in hole. Do not force line in hole.
NOTE: Take care when starting to wind the line as
not to pull either piece out of the slotted hole.
8. Wind the lines in tight even layers, onto the inner
reel (Fig. 6-5). Wind the line in the direction indicat-
ed on the inner reel. Place your index finger
between the two lines to stop the lines from over-
lapping. Do not overlap the ends of the line.
Proceed to step 11.
Membrane Line Installation
9. Take approximately 10 feet (3 m) of new trimming
line. Insert one end of the line into the slotted hole
in the inner reel (Fig. 6-4). Only about 1/2 inch of
line will fit in hole. Do not force line in hole.
10. Before winding, split the other end of the line back
about 6 inches.
11. Wind the line in tight even layers in the direction
indicated on the inner reel. Do not twist the line
while winding.
NOTE: Failure to wind the line in the direction indi-
cated will cause the cutting line not to advance.
Tab
Bottom Cover
Fig. 6-1
Fig. 6-2
Inner Reel
Outer Spool
Pawl
Pawl
Pin
Pin Wear
Cracking
PRESS TABS
TO REMOVE
Fig. 6-3