


The cord is not securely connected to the unit or
power source
Make sure each plug is securely connected
The GFCI in the outlet has tripped (if used) Reset the GFCI
CLEANING INSTRUCTIONS
Cleaning the Motor Housing and T
ubes
1. Stop the motor and disconnect the unit from the power source.
2. Wait for all moving parts to stop. Allow the unit to cool.
3. Use a firm-bristled, non-wire, brush or the air discharge of a vacuum cleaner brush to remove
debris from the tubes, air openings and impeller.
4. Wipe the unit down with a damp cloth. Do not douse the unit with water. Do not use solvents or
strong detergents.
Cleaning the Vacuum Bag
Cleaning the vacuum bag helps prevent deterioration and air flow obstruction, which will reduce the
performance of the vacuum.
• Wear eye protection and a dust mask when cleaning the vacuum bag.
• Clean the vacuum bag after each use or more often if needed:
1. Empty the vacuum bag.
2. Turn the vacuum bag inside out.
3. Vigorously shake out any remaining dust and debris.
4. Turn the vacuum bag right side out.
• Wash the vacuum bag once per year or more often if needed:
1. Turn the vacuum bag inside out.
2. Hang the vacuum bag up.
3. Hose down the vacuum bag thoroughly.
4. Hang the vacuum bag up and allow to dry.
5. Turn the vacuum bag right side out.
STORAGE INSTRUCTIONS
1. Follow the Cleaning Instructions listed above.
2. Store the unit indoors in a dry, high and/or locked location, out of the reach of children and other
unauthorized persons.
WARNING:
Do not let brake fluids, gasoline, petroleum-based products, penetrating oils,
etc., come in contact with plastic parts. These chemicals may damage, weaken and
destroy plastic, which may result in serious personal injury.
SPECIFICATIONS*
* All specifications are based on the latest product information available at the time of printing. We
reserve the right to make changes at any time without notice.
Motor Type . . . . . . . . . . . . . . . . . . . . . . . . . . . . . . . . . . . . . . . . . . . . . . . . . . . . . . . . . . . Electric, Corded
Motor Voltage . . . . . . . . . . . . . . . . . . . . . . . . . . . . . . . . . . . . . . . . . . . . . . . . . . . . . . . . . . . . . . . 120 VAC
Motor Amperage . . . . . . . . . . . . . . . . . . . . . . . . . . . . . . . . . . . . . . . . . . . . . . . . . . . . . . . . . . . . 12 Amps
Motor Speed . . . . . . . . . . . . . . . . . . . . . . . . . . . . . . . . . . . . 17,000 rpm (Blower) / 14,000 rpm (Vacuum)
Maximum Blower Air Volume . . . . . . . . . . . . . . . . . . . . . . . . . . . . . . . . . . . . . . . . . . . . . . . . . . . 450 CFM
Maximum Blower Air Speed . . . . . . . . . . . . . . . . . . . . . . . . . . . . . . . . . . . . . . . . . . . 240 mph (386 km/h)
Mulching Ratio. . . . . . . . . . . . . . . . . . . . . . . . . . . . . . . . . . . . . . . . . . . . . . . . . . . . . . . . . . . . . . . . . . 16/1
Vacuum Bag Capacity . . . . . . . . . . . . . . . . . . . . . . . . . . . . . . . . . . . . . . . . . . . . . . . . . 1.28 bushels (45 l)
Weight (as Blower). . . . . . . . . . . . . . . . . . . . . . . . . . . . . . . . . . . . . . . . . . . . . . . . . . . . . . 6 lb 12 oz (3 kg)
CLEANING AND STORAGE
TROUBLESHOOTING
NOTE: For maintenance beyond the minor adjustments listed above, or for replacement parts, please call
the Customer Support Department at 1-800-828-5500 (U.S.) or 1-800-668-1238 (Canada).
The impeller (fan) is damaged Have the unit serviced by an authorized service
center
The tubes, blower opening or impeller is blocked Clear the blockage. Refer to Clearing a Blocked
Tube or Impeller in the Maintenance and Repair
Instructions section.
The vacuum bag is full Empty the vacuum bag
The vacuum bag is dirty Clean the vacuum bag
The vacuum bag is torn Replace the vacuum bag
The vacuum bag is unzipped Zip up the vacuum bag
THE MOTOR WILL NOT RUN
MAINTENANCE AND REPAIR INSTRUCTIONS
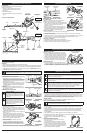
CLEARING A BLOCKED TUBE OR IMPELLER
1. Stop the motor and wait for all moving parts to stop.
2. Disconnect the unit from the power source and allow the unit to cool. Refer to Connecting and
Disconnecting the Power Source.
3. If the unit is in blower mode, disconnect the blower tube and nozzle from the motor housing. Then
disconnect the nozzle from the blower tube.
4. If the unit is in vacuum mode, disconnect the upper and lower vacuum tubes from the motor
housing. Then disconnect the lower vacuum tube from the upper vacuum tube. Also disconnect
the vacuum bag assembly from the motor housing.
5. Carefully remove any material that may be blocking the tubes, blower opening and/or impeller. Use a
firm-bristled, non-wire, brush to clear all debris. Rotate the impeller blades by hand to ensure that any
blockage is completely cleared. Inspect the impeller blades to make sure no damage has occurred.
6. Once clear of obstructions, re-assemble the unit. Refer to Assembly Instructions.
7. Connect the unit to the power source and resume use.
NOTE: If it is necessary to replace damaged or missing parts, use only manufacturer suggested
replacement parts. The use of any other parts may create a hazard or cause product damage and
will VOID the warranty.
INSPECTING EXTENSION CORDS
1. Inspect all extension cords periodically. Look closely for deterioration, cuts or cracks in the
insulation. Also inspect the connectors for damage.
2. Replace the cords if any defects or damage appear.
WARNING:
Before inspecting, cleaning or servicing the unit, stop the motor, wait for all
moving parts to stop, disconnect the unit from the power source and allow the unit to cool.
Failure to follow these instructions can result in serious injury or property damage.
THE MOTOR RUNS, BUT THE UNIT WILL NOT BLOW OR VACUUM
4
OPERATING INSTRUCTIONS
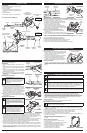
OPERATING AS A VACUUM
1. Start the motor. Refer to Starting and Stopping Instructions.
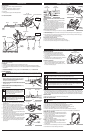
2. Hold the unit with the vacuum inlet several inches above the floor or ground (Fig. 10).
3. Sweep the vacuum inlet from side to side while slowly advancing to collect light debris (Fig. 10).
The debris will flow into the vacuum bag. Items such as small leaves and small twigs will be
mulched as they pass through the fan housing, allowing the vacuum bag to hold a substantial
amount of debris.
4. When the vacuum bag is full, suction will noticeably decrease. Stop the motor, disconnect the unit
from the power source and then disconnect the vacuum bag from the unit. Unzip the vacuum bag
and empty the contents. Dispose of debris appropriately.
Adjusting the Shoulder Strap
1. Make sure the variable-speed switch is in the OFF position and the unit is disconnected from the
power source.
2. With the left hand, hold the unit in an upright position. Support the lower vacuum tube on the ground.
3. Place the shoulder harness over the head and onto the left shoulder.
4. With the right hand, adjust the shoulder harness until the vacuum bag and shoulder harness are
comfortable and well-balanced. Make sure the shoulder harness is adjusted to allow a free flow of
air. If the bag is kinked, the unit will not operate properly.
Fig. 10
WARNING:
To avoid serious injury, do not wear loose fitting garments, such as scarves,
strings, chains or ties, which could be drawn into the air intake. Long hair must be pulled
back and secured at the shoulders and neck.
WARNING:
To avoid serious injury, never disconnect the vacuum bag without first
turning off the motor and disconnecting the unit from the power source.
WARNING:
To avoid serious injury, do not
vacuum wet debris or water as this may result in
damage to the unit and possible electric shock.
The unit is designed to pick up dry material such
as leaves, grass, small twigs and bits of paper.
To avoid severe damage to the impeller, do not
vacuum metal, broken glass, etc.
WARNING:
When the upper and lower
vacuum tubes are removed, always make sure
the vacuum door is snapped closed before
connecting the unit to the power source.
Failure to do so could result in serious injury
from the impeller.
CAUSE SOLUTION