


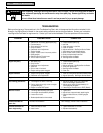

Maintenance
5
Section
10
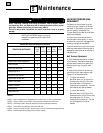
REQUIRED MAINTENANCE SCHEDULE
BEFORE EVERY EVERY EVERY AS
REQUIRED MAINTENANCE EACH 5 25 100 NOTED
USE HOURS HOURS HOURS
Check engine oil level ••
Check trimmer lines • 1
Check trimmer head engagement •
Clean machine • 3
Check nuts and bolts •
Change engine oil • 2, 5
Service air filter system • 5
Clean under mower deck •
General lubrication •
Inspect drive belt •
Clean engine • 4
Check wear cup
• 6
NOTE 1 – New line replacement is suggested when old line is 50% or less of original length.
NOTE 2 – Change oil after first two hours of new operation; thereafter every 25 hours.
NOTE 3 – Clean daily if used in extremely dusty/dirty conditions (see engine manual).
NOTE 4 – Clean before using machine, and at each fuel refill.
NOTE 5 – Service more often if used in extremely dusty or dirty conditions (see engine manual).
NOTE 6 – Replace when severe gouges exist on bottom surface.
Chart 5-1
Before inspecting, cleaning or servicing the machine, shut off engine, discon-
nect spark plug wire, and make sure that all moving parts have come to a com-
plete stop. Remove ignition key on electric start models.
Failure to follow these instructions can result in personal injury or property
damage.
WARNING
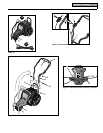
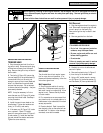
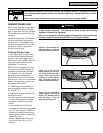
ADJUSTING TRIMMER HEAD
ENGAGEMENT
The tension on the drive belt must be
correct for proper operation of the trim-
mer head. If the tension is correct, the
trimmer head will rotate when the
Trimmer Head Control Bail is pulled back
against the handlebar.
A loose or worn drive belt causes the
trimmer head to move slowly, or not at
all, when the control bail is engaged (belt
squealing may also be noticeable).
If the belt tension is too tight, the trimmer
head may rotate before the control bail is
engaged, or when there is no free play in
the control bail.
Belt Tension Adjustment
1. Stop the engine and wait for all parts
to stop moving. Disconnect spark plug
wire and move it away from spark plug.
Remove ignition key on electric start
models.
2. Adjust the positions of the two jam
nuts on the control cable adjuster (see
Figure 5-2) as described below:
• To tighten belt tension:
Move the upper nut (A, Figure 5-2)
upward one or two full turns, then
move the lower nut (B) upward.
Tighten both nuts securely. Test unit
and readjust jam nuts as needed.
• To loosen belt tension:
Move the lower nut (B, Figure 5-2)
downward one or two full turns, then
move the upper nut (A) down.
Tighten both nuts securely. Test the
unit and readjust jam nuts as
needed.
NOTE: LEFT and RIGHT sides of unit are as
viewed from operator’s position behind the
handlebars.