


10
SECTION 6: MAINTAINING YOUR CHIPPER SHREDDER VACUUM
Lubrication
• Wheels: Lubricate the rear wheels with light oil
once a season.
• Nozzle Door Adjustment Levers: Lubricate each
adjustment lever once a season with light oil.
• Front Caster Wheels: Grease fittings are located
on the front caster wheels to provide easy
lubrication of the swivel pins.
Cleaning the Flail Screen
If the discharge area becomes clogged, remove the flail
screen and clean area as follows:
• Stop the engine and make certain the chipper
shredder vacuum has come to a complete stop.
• Disconnect spark plug wire from spark plug and
ground against the engine.
• Remove the vacuum bag and tamper plug from the
equipment and save.
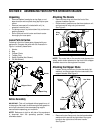
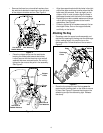
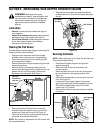
• Remove the four self-tapping screws from the
bottom of the discharge chute, and the hex bolt, flat
washer and hex nut from the top. Remove the
discharge chute assembly. See Figure 11.
Figure 11
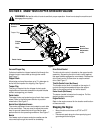
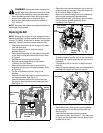
• Remove the two hex bolts and hex nuts which
extend through the impeller housing. Lift the flail
screen from inside the housing. See Figure 12.
• Clean the flail screen by scraping and/or washing
with water, and reinstall the screen.
NOTE: Be certain to reassemble the flail screen with
the curved side down.
• Reattach the discharge chute assembly with the
hardware previously removed and attach the bag to
the unit.
Figure 12
Servicing the Blades
NOTE: When tipping the unit, empty the fuel tank and
keep the spark plug side up.
• Disconnect the spark plug wire and ground it
against the engine.
• Remove the flail screen as instructed in the
previous section.
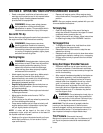
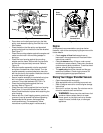
• Remove plastic belt cover from front of the engine
by removing the two self-tapping screws. See
Figure 13.
• Remove the access plate by removing two hex lock
nuts. See Figure 13.
• Locate one of the chipper blades in the access
opening by rotating the impeller assembly by hand.
Remove the chipper blade using a 3/16” allen
wrench and a 1/2” wrench.
• Remove other blade in the same manner to replace
or sharpen.
Figure 13
WARNING: Before performing any
maintenance or repairs, stop the engine, wait
until the machine comes to a complete stop,
disconnect the spark plug wire and ground
against the engine to prevent unintended
starting.
Discharge
Chute
Hex Bolt
Flat Washer
Hex Nut
Self-Tapping
Screws
Flail Screen
Hex Bolts
Hex Nuts
Belt Cover
Self-Tapping
Screws
Access Plate
Lock Nuts