11
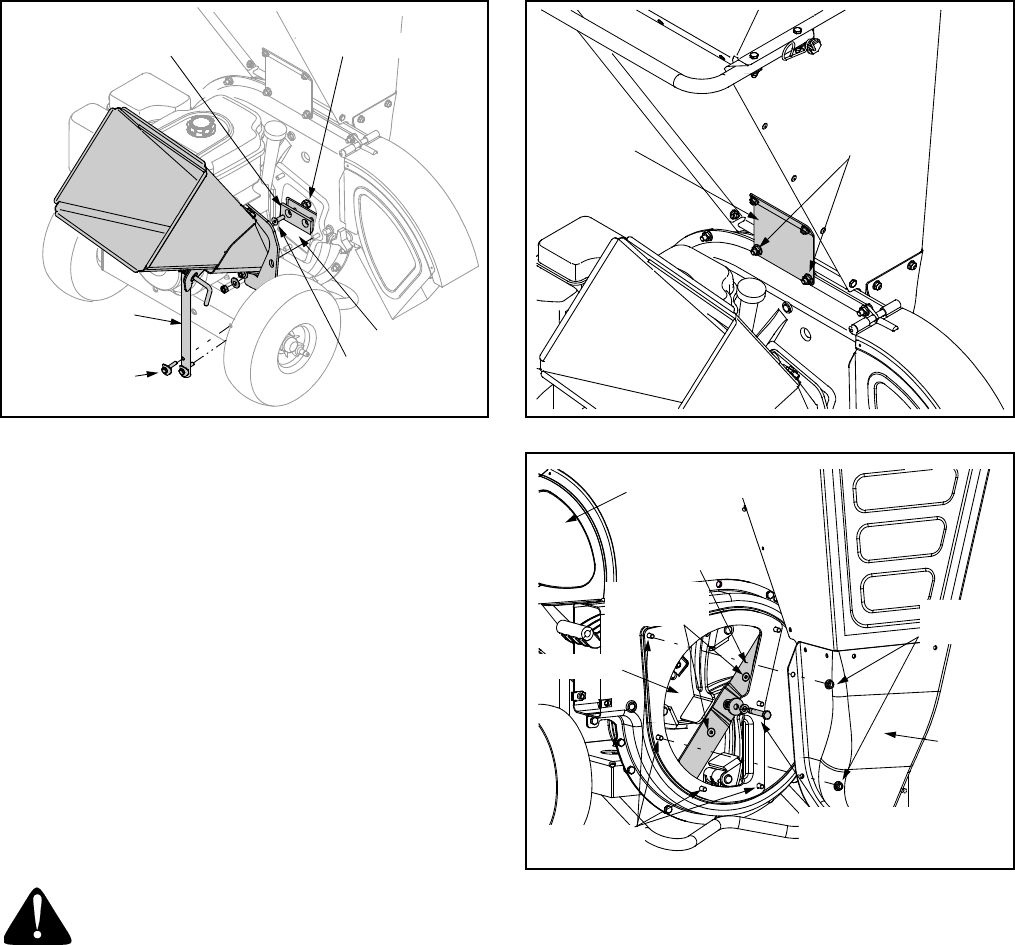
Figure 9
NOTE: Use a 3/16” hex key (Allen) wrench on the
outside of the blade and a 1/2” box (or socket) wrench
on the inside of the impeller. See Figure 9. Hold the
Allen wrench stationary and rotate the box (or socket)
wrench to loosen the nut.
• Install a replacement blade (Part No. 742-0544)
with the hardware removed earlier.
IMPORTANT:
Make certain blades are reassembled with
the sharp edge outward (toward the chipper chute).
Torque hardware to between 20 ft.-lbs and 25 ft.-lbs.
• To replace the other blade, rotate the impeller to
expose the second blade and repeat the steps
above.
Replacing the Shredder Blade
WARNING: The impeller’s chipper blades are
sharp. Wear leather work gloves to protect
your hands.
• Stop the engine and make certain that all moving
parts have come to a complete stop.
• Remove the two flange nuts (and hex bolts) which
secure the hopper support bracket to the impeller
housing. Retain the hardware. See Figure 10.
• Pivot the shredder screen upward as instructed
under the heading Cleaning the Reduction
Chamber.
• Remove the six flange nuts which secure the
hopper inlet guide to the impeller housing. See
Figure 11.
• Carefully separate the hopper assembly from the
impeller housing and set it aside.
• Insert a piece of wood into the chute deflector
opening to stabilize the impeller and prevent it from
rotating when removing the shredder blade.
Figure 10
Figure 11
• Remove the two internal hex screws which secure
the shredder blade to the impeller. See Figure 11.
NOTE: Use a 3/16” hex key (Allen) wrench on the
outside of the shredder blade and a 1/2” box (or socket)
wrench on the inside of the shredder blade. See Figure
11. Hold the Allen wrench stationary and rotate the box
(or socket) wrench to loosen the nut.
• Remove the hex bolt, lock washer, and flat washer
to completely free the shredder blade.
IMPORTANT:
If sharpening the blade for reuse, follow
the original angle of grind as a guide. Make certain
each cutting edge receives an equal amount of grinding
to prevent an unbalanced blade. Remove metal from
the heavy side until it is balanced evenly.
IMPORTANT:
When reassembling the blade, tighten
center bolt to between 45 ft.-lbs and 60 ft.-lbs and the
two out bolts to between 20 ft.-lbs and 25 ft.-lbs.
Chipper Blade
Lock Washer & Nut
Internal
Support Brace
Hex Bolts &
Saddle Washers
Hex Screw
Impeller
Flange Nuts
Support
Bracket
Chute Deflector
Shredder
Blade
Hex Bolt, Lock Washer
& Flat Washer
Flange
Nuts
Weld Studs
Internal
Hex Screws
Inlet
Guide
Impeller


