


11
Blade Care
WARNING: When removing cutting blade
for sharpening or replacement, protect
your hands with a pair of heavy gloves or
use a heavy rag to hold blade.
1. Disconnect spark plug wire from spark plug. Turn
mower on its side making sure that the air filter and
the carburetor are up.
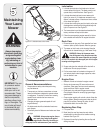
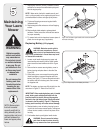
2. Remove bolt, blade bell support, blade, and adapter
from the engine crankshaft. See Figure 5-3.
NOTE: When removing the blade, adapter, etc., be care-
ful not to remove or misplace parts above it associated
with the engine pulley.
3. The blade can be sharpened with a file or on a grind
-
ing wheel. Do not attempt to sharpen the blade while
it is still on the mower. When sharpening blade, follow
original angle of grind. Grind cutting edges equally to
keep blade balanced.
4. Remove blade from the adapter for testing balance.
Balance the blade on a round shaft screwdriver to
check. Remove metal from the heavy side until it
balances evenly.
WARNING: An unbalanced blade will
cause excessive vibration when rotating
at high speeds. It may cause damage to
mower, and could break causing personal injury.
5. Lubricate the engine crankshaft and the inner surface
of the blade adapter with light oil. Slide the blade
adapter onto the engine crankshaft. Place the blade
on the adapter such that the side of the blade marked
“Bottom” (or with part number) faces the ground when
the mower is in the operating position. Make sure that
blade is aligned and seated on blade adapter flanges.
6. Place blade bell support on the blade. Align notches
on the blade bell support with small holes in blade.
Replace hex bolt and tighten hex bolt to torque: 450
in. lbs. min., 600 in. lbs. max.
To ensure safe operation of your mower, periodically
check the blade bolt for correct torque.
Belt Care
1. Disconnect the spark plug wire and ground it against
the engine.
2. Drain the fuel tank or place a piece of plastic beneath
the cap to prevent gasoline leakage.
3. Tip mower on its side (air cleaner side of engine up).
4. Remove blade, adapter, and related hardware as
instructed under “Blade Care” above. See Figure 5-3.
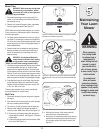
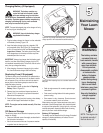
5. a. Remove the self-tapping screws that secures the
engine baffle to the deck . See Figure 5-4. Remove
engine baffle.
b. Loosen self-tapping screw that secures deck baffle
to the deck. See Figure 5-4.
5
Maintaining
Your Lawn
Mower
WARNING
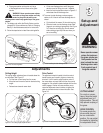
Figure 5-3: Remove the bolt and blade bell support to access
the blade and underside components.
6. a. Working from the rear of the mower, carefully
remove belt from transmission pulley.
b. Once belt is off transmission pulley, push down on
deck baffle to access engine pulley and slide belt
off this pulley and out from under the deck. See
Figure 5-5.
An unbalanced
blade will cause
excessive vibration
when rotating at high
speeds. It may cause
damage to mower and
could break causing
personal injury.
When removing
the cutting blade
for sharpening or
replacement or
when sliding the belt
around it, protect
your hands with a
pair of heavy gloves
or use a heavy rag to
hold the blade.
Figure 5-5: Remove belt from transmission and engine pulley.
Figure 5-4: A. Remove the screws that hold the engine baffle
onto the deck. B. Loosen the screw that holds deck baffle onto
deck.
A
B
A
B