


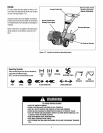

Fig. 2-3: Wheelin FREEWHEELposition
STEP4: INSTALL FORWARD
CLUTCH CABLE
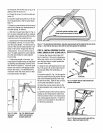
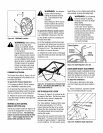
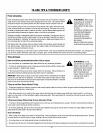
1. Attach theforward clutch cablebracket
(P,Fig.2-4) to the handlebarsupport AI
with a 1/4"-20x 1-1/42hexhd. screw (R)
and V4"-20 hexIocknut (S). Tightense-
curely.
2. Carefullyunwrapthe forward clutch ca-
ble (cablewithout anattachedknob, from
its shipping position and slidethe thin ca-
ble wire (T.Fig.2-4 intothe slot in the ca-
ble bracket. Pushthe cableconnector (U.
Fig.2-4) upthrough the holein thebracket
until the groove in the connector snaps
into place.
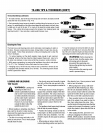
3. Insertthe #10-24 x 2" slotted hd.screw
(V,Fig.2-5) downthrough the hookedend
of the cablespring (W) until the screw
Fig.2,2:AHachhandlebar, threads extendthrough the spring.
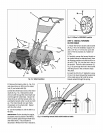
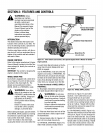
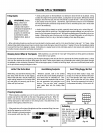
2. Removethe hairpin cotter (L, Fig.2-3)
and wheeldrive pin (M) from the wheel
hub (0) and wheel shaft (N).
3. Slidethe wheelfully inwardonthewheel
shaft (N, Fig.2-3). Reinstallthe wheel
drive pin (M) through the wheelshaft only
(not through thewheel hub). Securethe
wheeldrive pin with the hairpin cotter (L),
pushingthe hairpincotter in asfar asit will
go. Thewheel should now spin freely
(freewheel) on the wheelshaft. Repeat
with the other wheel.
4. Usethe handlebarto roll the tiller to a
flat area.
IMPORTANT:Beforestarting theengine,
thewheels must be placedin theWHEEL Fig.2=4:Installingforwardclutchcablebracketandcable.
DRIVEposition (pins through wheelhubs
andwheelshaft). Thisprocedureis
described in WheelDrive Pinsin Section3.