


6
NOTE: This Operator’s Manual covers several models.
Snow thrower features vary by model. Not all features
discussed in this manual are applicable to all snow
thrower models.
NOTE: All references to left or right side of the snow
thrower is from the operating position only
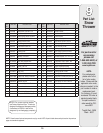
Contents of Carton
Carton contents are listed below with part numbers in
parentheses.
1. Two Ignition Keys (725-0201)
2. 20 oz. Bottle 5-30W Oil (737-0209)
3. Extension Cord (if so equipped) (629-0071)
WARNING: Disconnect the spark plug
wire and ground it against the engine to
prevent unintended starting.
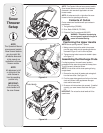
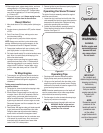
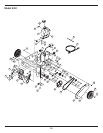
Positioning the Upper Handle
NOTE: Remove packing material, if present.
1. Making sure not to pinch the cable in the process,
pivot the upper handle into the operating position as
illustrated in Figure 3-1 until it clicks into place.
2. Tighten the wing knobs to secure the handle in place
as in Figure 3-1.
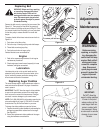
Assembling the Discharge Chute
For shipping reasons, the snow thrower has been
packaged with the upper chute pivoted all the way down.
To pivot it upward, proceed as follows:
NOTE: Turn the chute until the chute opening is facing
straight ahead.
1. Remove the wing knob, flat washer and carriage bolt
from the lower chute. See Figure 3-2.
2. Pivot the upper chute upward over the lip on the lower
chute so that there is NO gap between the upper
chute and the lower chute.
3. Re-secure with the hardware just removed. If installed
correctly, your snow thrower should look like Figure
3-3.
IMPORTANT: Do not use the chute handle to lift the
snow thrower
3
Snow
Thrower
Setup
Figure 3-2
NOTE:
This Operator’s Manual
covers several models.
Snow thrower features
vary by model. Not
all features discussed
in this manual are
applicable to all snow
thrower models.
NOTE:
All references to left
or right side of the
snow thrower is
from the operating
position only.
IMPORTANT:
Do not use the
chute handle to lift
the snow thrower.
Figure 3-1
Figure 3-3
Chute Handle
1
2
2
3
1