


Section 4: Operation 11
USE THE CORRECT
DIAMETER TRIMMER LINE
Before starting a project, look at the grass
or material you will be cutting.
For tougher conditions, use two (or four)
sections of the thicker gauge, .155" diame-
ter extra-heavy duty line. For less
demanding conditions, use two sections
of the thinner gauge, .130" diameter
heavy-duty line. The thicker line has the
heft to chop through tougher materials,
while the thinner line provides a more pre-
cise cut. To change trimmer lines, refer to
“Changing Trimmer Lines” in Section 5.
NOTE: The thinner line is also recom-
mended for use near trees or ornamentals
to help prevent girdling (cutting the bark).
USING THE TRIMMER
HEAD CONTROL BAIL
Before starting the engine, know how to
use the Trimmer Head Control Bail.
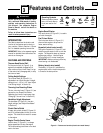
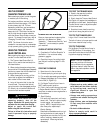
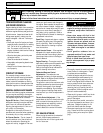
1. The Trimmer Head Control Bail (A,
Figure 4-3) is used to start and stop trim-
mer head rotation.
2. When starting the engine, always have
the control bail in the disengaged (released)
position to prevent the trimmer head from
turning when the engine starts.
3. When the engine is running, pull the
control bail up against the handlebar to
start rotation of the trimmer head.
4. Let go of the control bail to stop the
trimmer head. The control bail should
spring forward to the disengaged position.
If it doesn’t, do not use the machine until
the control bail has been repaired.
OPERATING THE MACHINE
Once you have read and understood the
sections in this Manual on “Safety,”
“Assembly,” “Features and Controls,” and
“Operation,” you are ready to operate
your machine.
CHECKLIST BEFORE STARTING
1. Complete the “Pre-Start Checklist” in
this Section. You must wear safety
glasses or goggles.
2. Check the trimmer line cutting height
(see “Adjust Line Cutting Height” in this
Section.
STARTING THE ENGINE
1. Move the unit to the work area.
2. Connect spark plug wire to spark plug.
3. Put on safety-approved eye protection.
4. Release (disengage) the Trimmer Head
Control Bail (A, Figure 4-3).
5. Put Engine Throttle Control Lever in
FAST (rabbit symbol) position.
6. Push in fuel primer button as instructed
in Engine Owner’s Manual. NOTE: Do not
use primer to restart a warm engine after a
short shutdown.
7. Recoil Starting:
Pull recoil start rope slowly until resis-
tance is felt. Then pull rope out rapidly
to start engine. Let rope back in
slowly. NOTE: If engine fails to start
after three pulls, repeat step 6
Electric Starting:
Stand behind handlebars and turn igni-
tion key clockwise to crank engine. If
engine does not start after five (5) sec-
onds of cranking, release key and
repeat step 6. When engine starts,
release key.
TO START THE TRIMMER HEAD
1. Stand in the operator’s position
directly behind the handlebars.
2. Slowly close the Trimmer Head Control
Bail (Figure 4-3) against the handlebars to
activate the trimmer head. Use the Engine
Throttle Control Lever to adjust the speed
of the trimmer head.
3. Once the trimmer head is revolving,
push the unit along the path to be cut.
TO STOP THE TRIMMER HEAD
Let go of the Trimmer Head Control Bail.
The bail will return to its open position and
the trimmer head will stop turning.
TO STOP THE ENGINE
Put the Engine Throttle Control Lever in
the STOP position. (If time allows, first
move the throttle lever to the SLOW set-
ting before stopping the engine.)
Figure 4-3: Control bail.
A
If the trimmer head control bail is not
operating properly, shut off the
engine, disconnect the spark plug wire
and move the wire away from the plug.
Adjust or repair the control bail
before using the trimmer/mower.
Failure to follow this instruction could
result in personal injury or property
damage.
WARNING
NOTE: If the unit is operated in a
stationary position with the wear
cup in contact with dry vegetation,
significant heat will result that may
deform the plastic spindle or scorch
the vegetation.
THROWN OBJECT HAZARD!
• Objects such as rocks, pebbles, and
small debris will be thrown violently
by the cutting head, resulting in
significant hazard to eyes and
exposed body parts.
• Always wear safety-approved eye
protection and suitable clothing and
footwear.
• Keep children, pets and bystanders
50 feet away from machine while
operating.
• Be alert to hidden obstacles.
Failure to comply could result in
injury or property damage.
WARNING