


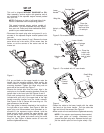


• Slide the two hooks on the side dis charge de flec tor
un der the hinge pin on the hinged mulch ing plug as -
sem bly.
• Lower the hinged mulch ing plug.
NOTE: Do not re move the hinged mulch ing plug at
any time, even when you are not mulch ing.
WARN ING: All mow ers are equipped with a rear
pro tec tive guard. The guard helps elim i nate pro -
jec tiles thrown by the blade from in jur ing the
op er a tor. DO NOT RE MOVE THIS GUARD.
OPERATION
Before Starting
Ser vice the en gine with gas o line and oil as in structed
in the sep a rate en gine man ual packed in your mower.
Read in struc tions care fully.
WARNING: Never fill fuel tank in doors, with en -
gine run ning or un til the en gine has been al -
lowed to cool for at least two min utes af ter run -
ning.
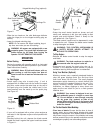
To Start En gine
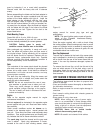
• At tach spark plug wire to spark plug. If unit is
equipped with a rub ber boot over the end of the spark
plug wire, make cer tain the metal loop on the end of
the spark plug wire (in side the rub ber boot) is fas -
tened se curely over the metal tip on the spark plug.
See Fig ure 10.
• If your unit is equipped with a primer, prime en gine as
in structed in the sep a rate en gine man ual packed with
your unit.
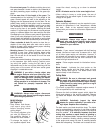
• Stand ing be hind the unit, de press the blade con trol
han dle and hold it against the up per han dle as shown
in Fig ure 11.
• Grasp the re coil starter han dle as shown and pull
slowly un til re sis tance is felt, then pull rap idly to start
en gine and avoid kick back. Re turn it slowly to the
rope guide bolt. See Fig ure 11.
The blade con trol han dle must be de pressed in or der
to op er ate the unit. Re lease the blade con trol han dle
to stop the en gine and blade.
WARN ING: THIS CON TROL MECH A NISM IS
A SAFETY DE VICE. NEVER AT TEMPT TO
BY PASS ITS OP ER A TIONS.
To Stop Engine :
• Re lease the blade con trol han dle to stop the en gine
and blade.
WARNING: The blade con tin ues to ro tate for a
few sec onds af ter the en gine is shut off.
• Dis con nect and ground the spark plug wire as in -
structed in the sep a rate en gine man ual to pre vent
ac ci den tal start ing while equip ment is un at tended.
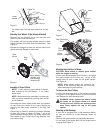
Using Your Mulcher (Optional)
Mulching mow ers use a spe cially de signed blade to
chop the grass clip pings ex tra fine and then blow
them back down into the lawn. The small clip pings
de com pose quickly be com ing a nat u ral fer til izer that
re turns much of the needed nu tri ents to the soil. Con -
tin u ous mulch ing means con tin u ous free nat u ral
fer til iza tion, no messy clip pings to worry about ever
again and the end re sult for you is a much greener
health ier lawn.
WARNING: Your mower is de signed to cut nor -
mal res i den tial grass of a height no more than
10". Do not at tempt to mow through un usu ally
tall, dry grass (e.g., pas ture) or piles of dry
leaves. De bris may build up on the mower deck
or con tact the en gine ex haust pre sent ing a po -
ten tial fire haz ard.
For The Best Results When Mulching:
• Clear lawn of de bris. Be sure that the lawn is clear of
stones, sticks, wire or other for eign ob jects which could
dam age the lawnmower. Such ob jects could be ac ci den -
tally thrown out by the mower in any di rec tion and cause
se ri ous per sonal in jury to the op er a tor and oth ers as well
as dam age to prop erty and sur round ing ob jects.
8
Fig ure 11
Starter
Handle
Blade
Con trol Han dle
Fig ure 10
Metal
Loop
on Spark
Plug Wire
Rubber Boot
Fig ure 9
Side Chute Deflector
(optional)
Hinged Mulching Plug (optional)
Hinge Pin