


6
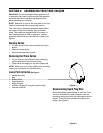
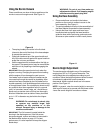
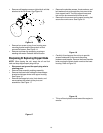
Attaching The Handle
• Remove the hairpin clips from the handle brackets
and remove the carriage screws and wing nuts from
the lower handle. See Figure 3A.
Figure 3
• Place the bottom holes in lower handle over the
pins on the handle brackets and secure with hairpin
clips.
• Insert carriage screws through upper hole in lower
handle from the inside and secure with wing nuts.
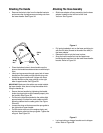
• Unfold the upper handle until it aligns with lower
handle. Make sure the rope guide is on the right
side of upper handle. See Figure 3B.
IMPORTANT:
Make sure the cables are routed outside
the lower handle. Also, do not crimp the cables while
lifting the handle up.
• Secure the two handles by tightening the handle
knobs (carriage bolts must be seated properly into
the handle). See Figure 3B.
• Pull the two cable ties attached to the cables tight
approximately 8 inches from each cable end and
place the cables into the cable guide. See Figure
3A and B.
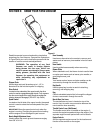
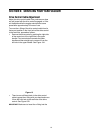
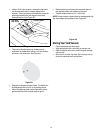
• Loosen the wing nut that secures the rope guide to
the right side of upper handle.
• Pull the starter rope out of the engine slowly and
slip the starter rope into the rope guide. Tighten the
wing nut. See Figure 5A.
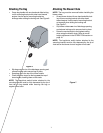
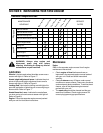
Attaching The Hose Assembly
• Slide hose adapter of hose assembly into the base
adapter located on the left front of the Yard
Vacuum. See Figure 4.
Figure 4
• Pull spring loaded pin out on the base and align pin
with the first hole (closest to the end of the tube) in
the hose adapter.
• Release the pin to lock the hose in place.
• Snap the hose handle first into the upper hose
handle bracket and then into the lower hose handle
bracket. Refer to Figure 5A.
Figure 5
• Lay hose tubing on hanger bracket next to chipper
chute. Refer to Figure 5B.
Rope
Guide
Wing
Nut
Cable
Tie
Handle
Knobs