


6
3
Section
ASSEMBLY
Your generator requires some assembly and is ready for
use after it has been properly serviced with the
recommended oil and fuel.
If you have any problems with the assembly of your
generator, please call the generator helpline at
1-888-611-6708.
Remove Generator From Carton
1. Set carton on a rigid flat surface with “This Side Up”
arrows pointing upward.
2. Carefully open top flaps of shipping carton.
3. Cut down corners at one end of carton from top to
bottom and lay that side of carton down flat.
4. Remove all packing material, carton fillers, etc.
5. Remove generator from shipping carton.
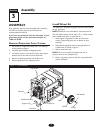
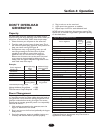
Install Wheel Kit
The wheel kit is designed to greatly improve the portability
of your generator.
NOTE: Wheel kit is not intended for over-the-road use.
You will need a socket wrench with 1/2" or 13mm sockets
and a needle-nose pliers to install this kit.
1. Place bottom of generator cradle on a flat, even
surface.Temporarily place unit on blocks to ease
assembly.
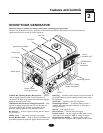
2. Slide axle through both axle mounting brackets on
cradle frame, as shown in Figure 1.
3. Slide a wheel over axle.
NOTE: Be sure to install both wheels with the air
pressure valve on the outboard side.
4. Place e-ring onto groove in axle.You may add the flat
washer if desired.
Support Leg
Hex Nut
Axle
Flat Washer
Cap Screw
Handle Assembly
Hex Nut
Wheel
E-Ring
Figure 1 — Install Wheel Kit
Cap Screw
Assembly