


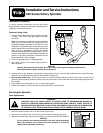


Changing Upper Nozzle
Note: Some of the nozzle assembly components
shown in the following procedure are no longer
available from Toro as service parts. This procedure
should only be used if the upper nozzle assembly is
already on hand.
1. Remove cap set screw with 1/8 in. hex wrench and
unscrew cap.
2. Remove nozzle container seal, nozzle retainer and
nozzle/drive assembly from body.
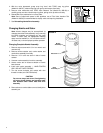
3. Straighten locking tabs on nozzle container with
nozzle container removal tool, Model No. 995-42 or
other appropriate tool (see Figure 3).
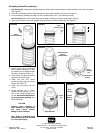
4. Remove nozzle container, nozzle screws and upper
nozzle assembly (see Figure 4).
5. Position new upper nozzle assembly and secure with
nozzle screws. DO NOT OVER-TIGHTEN
SCREWS. (See Figure 4 and Note below.)
Note: Over-tightening nozzle screws will expand
plastic nozzle base causing difficult nozzle container
replacement.
6. Align nozzle opening in container with nozzle orifices and press container downward until fully seated on nozzle assembly.
7. Bend locking tabs into notches approximately 90° to secure nozzle container.
Changing Stator
1. Place nozzle/drive assembly on a flat
work surface, nozzle down, and
compress return spring to expose
stator assembly (see Figure 5).
2. Separate stator from drive assembly
(held together by press fit) and
CAREFULLY relieve return spring
tension.
3. Press in new stator assembly to fully
seated position.
3
FIGURE 3
FIGURE 4 FIGURE 5
Container
Removal Tool
995-42
Upper
Nozzle
Assembly
Lower
Nozzle
Assembly
Stator
Assembly