


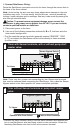


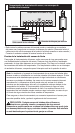
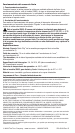

• Remove all common wires from the common terminal(s) and join to one
RainSensor wire lead using a twist-on wire connector. (Be sure to include the
common wire from the pump start relay or master valve in this connection).
Attach the remaining RainSensor wire lead to the valve common terminal.
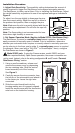
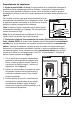
Testing the RainSensor Installation
To test the RainSensor operation, turn on a watering zone visible from the
RainSensor location. Press and hold down the Test Spindle; watering should
stop within a short time. If watering does not stop, recheck the wiring connec-
tions at the timer. If the timer has a Sensor Bypass switch, make sure the switch
is set to Active.
Note: The installation and operation of a freeze sensor should be used
in conjunction with frequent visual checks of your sprinkler system. While
freeze sensors are designed to prevent inadvertent watering during near
or below freezing conditions, there are instances in which manual interven-
tion is required. Air temperatures may be above freezing while ground and
vegetation temperatures remain below freezing. Operation of your sprinkler
system during these conditions may cause icing. Very rapid air tempera-
ture changes may also result in inadvertent watering, should the timing of
sprinkling coincide with rapid temperature changes. The Sensor should be
inspected for damage and manually tested regularly to ensure proper
operation.
Caution: Visual checks and prudent manual watering suspension
must be used in conjunction with any freeze sensor.
A freeze sensor should only be relied upon as an aid along with good
watering practices including frequent visual checks. This device is not
intended for farm/crop protection.
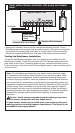
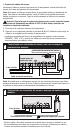
Common Wire From Valves
To Valves
Pump Start
Relay/Master
Valve
Irrigation System Timer
Timer without Sensor terminals, with pump start/master
valve:
C
Twist-on Wire Connector