


Assembly Section 2-6
ASSEMBLY
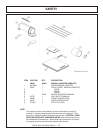
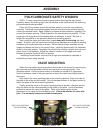
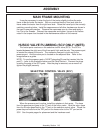
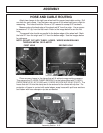
POLYCARBONATE SAFETY WINDOW
NOTE: In most cases this should be done before mounting the main frame.
Carefully remove the existing right rear cab window, to be replaced with the matching
polycarbonate window provided.
Clean all of the surfaces around the window opening, once the rear window is
removed. Peel back the protective paper from the area around the window that will
contact the window frame. Apply a bead of urethane window adhesive, supplied in kit,
around the window opening. Carefully position the new window into position. Fill the
remainder of the gap around the window with the adhesive, to finish. Be sure to
follow the instructions on the adhesive label when installing window.
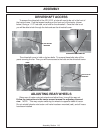
Next, install the upper and lower door hinges along with the existing cab door
hinges. To do this, you will remove the existing hinge hardware and install the existing
hardware on the polycarbonate as shown. Set the safety screen assembly on the
hinges and attach the door to the tractor frame. Install the brackes with the hardware
shown in the parts section. Assemble the rod with the vibration isolator and nuts and
attach them to the brackets. Adjust the vibration isolator on the upper and lower
brackets to achieve a good fit with the window.
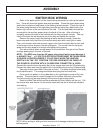
Installing a boom mower requires that all right side windows be replaced or
shielded by a lexan safety window.
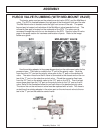
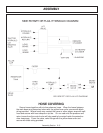
BOLT HOLE LOCATIONS
FOR VALVE MOUNT
BOLT HOLE LOCATIONS
FOR VALVE MOUNT
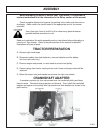
VALVE MOUNTING
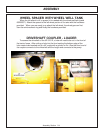
Attach the rear valve mounting bracket to the fender of the tractor by removing the
two rear bolts on the left fender and the two rear bolts on the right fender. See
illustration below. Drill the square holes in the fenders to accept 3/8” capscrews.
Use the hardware noted in the parts section to attach the valve mounting bracket to
the tractor.
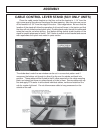
Next, attach the valve mounting plate to the mounting bracket. Align the holes on
the plate to the holes on the bracket. Use the hardware shown in the parts section to
attach the plate to the valve mounting bracket.
Finally, place the valve on the valve mounting plate as shown in the parts section.
Align the holes on the valve assembly to the holes on the plate. Use the hardware
provided to secure the valve to the plate. Refer to the parts section for the
placement of the valve and the hardware used. Please handle the lift valve with
care. It is extremely heavy and contains small parts.